Showing posts with label alphabet stamps. Show all posts

Monday, October 21, 2019

Using Leftover Packaging to Make Halloween Decor

This will be my last Halloween project.  I spent Saturday creating Christmas cards for an upcoming local class and it was so exciting to play with all of it!  If you are in the Pittsburgh, PA area, I invite you to the 5 Cards of Christmas at the Sewickley Public Library on November 12.  Event details are found here.  I am IN LOVE with the cards we're making!

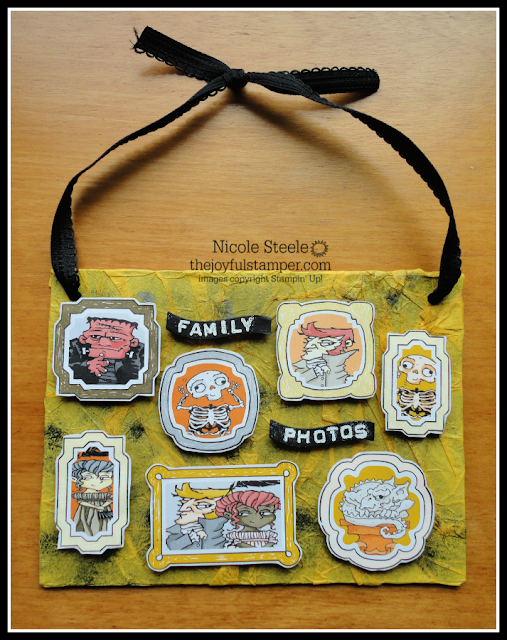
Halloween decor piece using Monster Bash DSP and chipboard packaging by Nicole Steele The Joyful Stamper

When I opened my package of Coffin Treat Boxes to make this treat holder, I was impressed with the sturdiness of the chipboard backing.  I saved it, knowing I wanted to make something out of it.  This is that something!  

Halloween decor piece using Monster Bash DSP and chipboard packaging by Nicole Steele The Joyful Stamper

It's quirky, it's weird, but I adore it!  The images were cut from a sheet of the Monster Bash Designer Series Paper and added with Stampin' Dimensionals.  This particular sheet stumped me when it came to cards, but it was perfect for this project.  I randomly sponged Memento Tuxedo Black ink on the tissue paper.  Follow along with the photo tutorial as I show you how to create the foundation.

Gather your supplies - Mod Podge, foam brush, chipboard piece, and tissue paper.  Start with tissue much larger than the chipboard piece, but there are no exact measurements for this.
photo tutorial for Halloween decor piece using Monster Bash DSP and chipboard packing by Nicole Steele The Joyful Stamper


Using the foam brush, cover the chipboard with Mod Podge.
photo tutorial for Halloween decor piece using Monster Bash DSP and chipboard packing by Nicole Steele The Joyful Stamper


Lay the tissue paper on the Mod Podged side of the chipboard.  Gently scrunch to create wrinkles.  If it accidentally tears, push more tissue paper over that spot.
photo tutorial for Halloween decor piece using Monster Bash DSP and chipboard packing by Nicole Steele The Joyful Stamper


Flip the chipboard over and add Tear 'N Tape along all four sides.
photo tutorial for Halloween decor piece using Monster Bash DSP and chipboard packing by Nicole Steele The Joyful Stamper


Trim the tissue paper and clip the corners on a diagonal (this makes for neater folded corners).  Remove the Tear 'N Tape liner.
photo tutorial for Halloween decor piece using Monster Bash DSP and chipboard packing by Nicole Steele The Joyful Stamper


Fold over the tissue paper edges and press onto the adhesive.
photo tutorial for Halloween decor piece using Monster Bash DSP and chipboard packing by Nicole Steele The Joyful Stamper


Punch some holes in the finished piece and run Basic Black Scalloped Ribbon through them, knotting it at the top, to create a hanger.

I made a second decor piece using the same process.  I accidentally deleted the photo of it but I do have the side-view close-ups. 


For this one, I die-cut a bunch of frames from the Ornate Frames dies set and added them with Stampin' Dimensionals.  Some images were stamped (from Spooktacular Bash), colored with Stampin' Blends, then trimmed with Paper Snips.  I added some retired Pumpkin Pie Glimmer Paper and stuck on the crows from the Monster Bash Enamel Shapes pack.  You can make any color glimmer paper by using a sponge dauber and ink pad to add color to Sparkle Glimmer Paper.


It's great when we can make decorative pieces from things we would ordinarily toss.  I have a weakness for sturdy chipboard.  Here are two other fun uses:
  • Make a mini album - of a vacation, senior portraits, school pictures, Christmas through the years, your baby month-by-month.....there are tons of ideas!
  • Run it through a Xyron with a magnet cartridge for homemade die storage


You'll find the supplies for these projects in my online store.  Just click on the link and it will take you straight to it.  I appreciate your business!


Shop with Nicole Steele The Joyful Stamper


Sweet 'N Simple Monthly Card Class
Local live teaching (Pittsburgh, PA area)
Event details here
Sweet 'N Simple monthly card class - October 30 - with Nicole Steele The Joyful Stamper

Thursday, June 20, 2019

Old Stuff is Fun, Too

I get it.  

I understand the hold-your-breath anticipation of seeing the UPS truck rumble down your street, knowing your Stampin' Up! order is out for delivery and on that vehicle.

I, too, have felt the heart-pounding thrill of seeing that truck stop in front of your home and the beautiful man in brown walking to your front porch with a (hopefully) large box that has "Stampin' Up!" printed on its sides.

And maybe, once you have opened the box and lovingly caressed your precious new supplies, you even SNIFFED THE PAPER.  

I do it.

A new Stampin' Up! order is fun to get and will always be fun to get.  But it is also fun to blow the dust off our older supplies and create with those.  Doing so brings back memories and feelings of nostalgia for me, because seasons of my life are tied up in when I first enjoyed those older products.  My newer supplies haven't had a chance yet to make those sentimental connections.


12 x 12 scrapbook layout of Alaina's ballet photo

I got my youngest daughter Alaina's dance photos back and decided to participate in Sketch-N-Scrap's sketch challenge.  


close up of 12 x 12 scrapbook layout dance embellishments

I will never part with Stampin' Up!'s En Suite set.  I tried to get a good shot of this - I stamped in Versamark on Basic Black cardstock, sprinkled with black embossing powder, then heat set.  I love the subtle effect it adds to the layout!  I die-cut the images with our Stitched Shapes Dies and Stitched Rectangle Dies.


close up of title and punched flower embellishment

The flower piece in Alaina's hair inspired this embellishment.  I used the retired Blossom Builder, Pansy, and Petite Petals punches to create it with Cherry Cobbler  and Basic Black cardstocks.  The new Hot Air Balloon punch would make great large petals, too!  My title was stamped with the Letterpress Alphabet set (one of the first sets I ever got) in Real Red ink and cut with Paper Snips.  The Paper Snips are small and sharp enough to navigate these letters and make fussy cutting a breeze.  

I didn't want white pearls on my title so I colored them with my Dark Basic Black Stampin' Blend marker.  You can make your pearls any color you want with our Stampin' Blend markers! 

This layout is going into a 12" x 12" shadow box I got here and will be hung on our living room wall.  Alaina also dances in Lyrical and Jazz classes so I'll show you those layouts in future posts.  I hope I've inspired you to mix old and new products on your layouts!  Leave me a comment letting me know what you like to scrapbook!

If you would like a copy of the NEW Stampin' Up! Annual Catalog and you don't already have a demonstrator you love, send me an email at nicole@thejoyfulstamper.com.  I'd love the opportunity to earn your business!  


01 09 10