Showing posts with label home decor. Show all posts

Friday, September 11, 2020

Christmas Triangle Luminary Box - Facebook Live Class

 Yesterday in my live class, I showed how to make a Triangle Luminary Box that I first saw on Splitcoaststampers.  That one used Stampin' Up!'s Magic In This Night suite.  My second version uses the Snowflake Splendor suite for Christmas decor.  You could also use this as a gift box.

christmas, snowflake splendor, luminary box, tealight box, gift box, stampin' up!, home decor, paper crafts, stamping, nicole steele, independent stampin' up! demonstrator in pittsburgh pa, the joyful stamper

This frame die from So Many Snowflakes was PERFECT for this luminary box!  It will glow beautifully from the electric tealight inside (you can find them at your local dollar store).  And how appropriate is this sentiment from Snowflake Wishes?  I stamped it in Pacific Point ink on Whisper White cardstock and trimmed it closely with a pair of Paper Snips.


christmas, snowflake splendor, luminary box, tealight box, gift box, stampin' up!, home decor, paper crafts, stamping, nicole steele, independent stampin' up! demonstrator in pittsburgh pa, the joyful stamper

Here's the top of the box.  I stamped and stacked snowflakes in Pacific Point, Balmy Blue, and Balmy Blue Glimmer Paper.  They were all stamped and cut with the Snowflake Wishes Bundle.  The Snowflake Splendor ribbon around the box top edge is also from the suite.  

christmas, snowflake splendor, luminary box, tealight box, gift box, stampin' up!, home decor, paper crafts, stamping, nicole steele, independent stampin' up! demonstrator in pittsburgh pa, the joyful stamper

The ribbon has an iridescent sparkle that is multi-colored.  It reminds me of snow on a very sunny day!  I decorated the vellum panels with some of the larger snowflakes dies used with Balmy Blue Glimmer Paper.  I'm almost out of that stuff!

christmas, snowflake splendor, luminary box, tealight box, gift box, stampin' up!, home decor, paper crafts, stamping, nicole steele, independent stampin' up! demonstrator in pittsburgh pa, the joyful stamper

You can see my Halloween version in yesterday's post here.  In the Live class, I also made a Halloween Popcorn Wrapper - I'll feature that up-and-close on Sunday.

πŸ‘‡Don't forget!πŸ‘‡

Place a $35 minimum order in my store by midnight Sunday September 13 and I'll send you the packets to make Thursday's Live projects (the Halloween Luminary Box and Popcorn Wrapper).  You must use the September Host Code RX9NSXJB when ordering.  


shop for stampin' up! supplies, craft supplies, stamping supplies, independent stampin' up! demonstrator, pittsburgh pa, nicole steele, the joyful stamper

Today is the last day to order a Creativity Kit from The Joyful Stamper!  Read the details here.

creativity kits, stamp kits, stampin' up! kits, gather together stamp set, gathered leaves dies, gather together bundle, fall cards, homemade cards, learn to stamp, how to make a card, stamp clubs, nicole steele, independent stampin' up! demonstrator pittsburgh pa


Free embossing folder when you order the new Stampin' Cut & Emboss in my store!  Details here.

die-cutting and embossing machines, Stampin' Cut & Emboss, Stampin' Up!, free embossing folders, stamping specials, stamping promotions, stamping sales, nicole steele, the joyful stamper, independent stampin' up! demonstrator, pittsburgh pa


Join my team of Joyful Stampers and get 2 stamp sets, card kits, and Rhinestones for free!  Details here.


If you are enjoying The Joyful Stamper site

  • Request a catalog package here, if you don't already have a demonstrator you love.
  • Subscribe to Stampin' News, a weekly email that delivers fun, tips, and specials right to you.  Get a free exclusive Stampin' News Subscriber pdf tutorial as a sign-up thank you!
  • Shop my store and to save money check out the Clearance Rack and Discounted Bundles.
  • Use this month's Reward Code to earn points towards a $50 shopping spree - read the details here.
  • Join me every Thursday at 11 AM ET for my weekly Happy Half Hour Live stamping show on my Facebook page.  


Joy in being creative, community in sharing a common interest, purpose in what we make - this is stamping at its best!  Thank you, friends, for choosing me as your demonstrator!

Nicole Steele, Owner of The Joyful Stamper, Independent Stampin' Up! Demonstrator


Thursday, September 10, 2020

Halloween Triangle Luminary Box - Facebook Live Class

 Hello, my joyful friends!  Every Thursday at 11 AM ET I go live on The Joyful Stamper Facebook Page.  Everyone is invited for a half hour of stamping fun!  I'll post the replay and project sheet below for today's Happy Half Hour projects after the Live is over.

I waited until September before digging in to the Magic In This Night Suite.  Halloween is my favorite season to create things for!  I love to make Halloween home decor and treat packaging.  Usually, there's nothing left of my Halloween craft supplies by the end of October!

halloween, magic in the night, luminary box, tealight box, gift box, stampin' up!, home decor, paper crafts, stamping, nicole steele, independent stampin' up! demonstrator in pittsburgh pa, the joyful stamper
When I found this Triangle Luminary Box tutorial on Splitcoaststampers, I jumped right in to making this!  These boxes will look fantastic on my fireplace mantel, spookily lit from inside with an electric tealight!  Tomorrow I'll share the Christmas version I made, so be sure to stop back then, too.

halloween, magic in the night, luminary box, tealight box, gift box, stampin' up!, home decor, paper crafts, stamping, nicole steele, independent stampin' up! demonstrator in pittsburgh pa, the joyful stamper

Each side of the luminary is covered with Magic In This Night Designer Series Paper, then die-cut with the bats from the Halloween Magic Dies.  I saved those bats to add to the top of the box (see the photo later in this post).  Those little bats in the middle of the cut-out sections are from Black Glitter Paper.  I love the dark sparkle they add!

halloween, magic in the night, luminary box, tealight box, gift box, stampin' up!, home decor, paper crafts, stamping, nicole steele, independent stampin' up! demonstrator in pittsburgh pa, the joyful stamper

This edging die in the Halloween Magic Dies set was perfect to line the box lid.  I brushed on Wink Of Stella to give it a hint of shimmer.  It looks stunning in person!


halloween, magic in the night, luminary box, tealight box, gift box, stampin' up!, home decor, paper crafts, stamping, nicole steele, independent stampin' up! demonstrator in pittsburgh pa, the joyful stamper

Here's where those die-cut bat pieces went.  I curled their wing tips with a Bone Folder before gluing them to the lid.  It makes the lid eye-catching!  Don't forget to stop back to watch the replay if you can't catch the Live class and get the Project Sheet with the measurements.  And tomorrow I'll share my Christmas version here.

Watch the Live class replay below


--->>Get the Project Sheet with Measurements here<<<---


Place a $35 minimum order in my store by midnight Sunday September 13 and I'll send you the packets to make today's Live projects.  You must use the September Host Code RX9NSXJB when ordering.  


Shop the Holiday Mini and Annual Catalogs! Earn points with the Joyful Stamper Rewards program!

shop for stampin' up! supplies, craft supplies, stamping supplies, independent stampin' up! demonstrator, pittsburgh pa, nicole steele, the joyful stamper


Tomorrow is the last day to order a Creativity Kit from The Joyful Stamper!  Read the details here.

creativity kits, stamp kits, stampin' up! kits, gather together stamp set, gathered leaves dies, gather together bundle, fall cards, homemade cards, learn to stamp, how to make a card, stamp clubs, nicole steele, independent stampin' up! demonstrator pittsburgh pa


Free embossing folder when you order the new Stampin' Cut & Emboss in my store!  Details here.

die-cutting and embossing machines, Stampin' Cut & Emboss, Stampin' Up!, free embossing folders, stamping specials, stamping promotions, stamping sales, nicole steele, the joyful stamper, independent stampin' up! demonstrator, pittsburgh pa


Join my team of Joyful Stampers and get 2 stamp sets, card kits, and Rhinestones for free!  Details here.


If you are enjoying The Joyful Stamper site

  • Request a catalog package here, if you don't already have a demonstrator you love.
  • Subscribe to Stampin' News, a weekly email that delivers fun, tips, and specials right to you.  Get a free exclusive Stampin' News Subscriber pdf tutorial as a sign-up thank you!
  • Shop my store and to save money check out the Clearance Rack and Discounted Bundles.
  • Use this month's Reward Code to earn points towards a $50 shopping spree - read the details here.
  • Join me every Thursday at 11 AM ET for my weekly Happy Half Hour Live stamping show on my Facebook page.  


Joy in being creative, community in sharing a common interest, purpose in what we make - this is stamping at its best!  Thank you, friends, for choosing me as your demonstrator!

Nicole Steele, Owner of The Joyful Stamper, Independent Stampin' Up! Demonstrator

Monday, October 21, 2019

Using Leftover Packaging to Make Halloween Decor

This will be my last Halloween project.  I spent Saturday creating Christmas cards for an upcoming local class and it was so exciting to play with all of it!  If you are in the Pittsburgh, PA area, I invite you to the 5 Cards of Christmas at the Sewickley Public Library on November 12.  Event details are found here.  I am IN LOVE with the cards we're making!

Halloween decor piece using Monster Bash DSP and chipboard packaging by Nicole Steele The Joyful Stamper

When I opened my package of Coffin Treat Boxes to make this treat holder, I was impressed with the sturdiness of the chipboard backing.  I saved it, knowing I wanted to make something out of it.  This is that something!  

Halloween decor piece using Monster Bash DSP and chipboard packaging by Nicole Steele The Joyful Stamper

It's quirky, it's weird, but I adore it!  The images were cut from a sheet of the Monster Bash Designer Series Paper and added with Stampin' Dimensionals.  This particular sheet stumped me when it came to cards, but it was perfect for this project.  I randomly sponged Memento Tuxedo Black ink on the tissue paper.  Follow along with the photo tutorial as I show you how to create the foundation.

Gather your supplies - Mod Podge, foam brush, chipboard piece, and tissue paper.  Start with tissue much larger than the chipboard piece, but there are no exact measurements for this.
photo tutorial for Halloween decor piece using Monster Bash DSP and chipboard packing by Nicole Steele The Joyful Stamper


Using the foam brush, cover the chipboard with Mod Podge.
photo tutorial for Halloween decor piece using Monster Bash DSP and chipboard packing by Nicole Steele The Joyful Stamper


Lay the tissue paper on the Mod Podged side of the chipboard.  Gently scrunch to create wrinkles.  If it accidentally tears, push more tissue paper over that spot.
photo tutorial for Halloween decor piece using Monster Bash DSP and chipboard packing by Nicole Steele The Joyful Stamper


Flip the chipboard over and add Tear 'N Tape along all four sides.
photo tutorial for Halloween decor piece using Monster Bash DSP and chipboard packing by Nicole Steele The Joyful Stamper


Trim the tissue paper and clip the corners on a diagonal (this makes for neater folded corners).  Remove the Tear 'N Tape liner.
photo tutorial for Halloween decor piece using Monster Bash DSP and chipboard packing by Nicole Steele The Joyful Stamper


Fold over the tissue paper edges and press onto the adhesive.
photo tutorial for Halloween decor piece using Monster Bash DSP and chipboard packing by Nicole Steele The Joyful Stamper


Punch some holes in the finished piece and run Basic Black Scalloped Ribbon through them, knotting it at the top, to create a hanger.

I made a second decor piece using the same process.  I accidentally deleted the photo of it but I do have the side-view close-ups. 


For this one, I die-cut a bunch of frames from the Ornate Frames dies set and added them with Stampin' Dimensionals.  Some images were stamped (from Spooktacular Bash), colored with Stampin' Blends, then trimmed with Paper Snips.  I added some retired Pumpkin Pie Glimmer Paper and stuck on the crows from the Monster Bash Enamel Shapes pack.  You can make any color glimmer paper by using a sponge dauber and ink pad to add color to Sparkle Glimmer Paper.


It's great when we can make decorative pieces from things we would ordinarily toss.  I have a weakness for sturdy chipboard.  Here are two other fun uses:
  • Make a mini album - of a vacation, senior portraits, school pictures, Christmas through the years, your baby month-by-month.....there are tons of ideas!
  • Run it through a Xyron with a magnet cartridge for homemade die storage


You'll find the supplies for these projects in my online store.  Just click on the link and it will take you straight to it.  I appreciate your business!


Shop with Nicole Steele The Joyful Stamper


Sweet 'N Simple Monthly Card Class
Local live teaching (Pittsburgh, PA area)
Event details here
Sweet 'N Simple monthly card class - October 30 - with Nicole Steele The Joyful Stamper

Thursday, October 17, 2019

Facebook Live 10-15-2019

Did you miss my Facebook Live from two days ago?  You can watch it here!  And - confession - this is the 4th video I've ever made.  Please be kind and patient as I learn this new-to-me format - no drinking games with the amount of times I say "um"! πŸ˜‰  That being said, I am having a blast with it so I can promise you I'll be getting lots of practice with this!

So what's in the video?  

  • A Halloween decor piece I made from the chipboard backing of the Coffin Treat Boxes (it's thicker than a cereal box so it was perfect for what I wanted to do).  
  • Peeks of projects from my monthly Sweet 'N Simple class (if you are in the Pittsburgh, PA area, do come)!
  • My October Host Code gifts to you, because I am grateful for you!
  • An adorable Wiggle Worm card!


I'm still playing around with a regular day and time, but Tuesdays at 1pm EST seem to be the best right now.  Once I get things established, I'll announce a regular day and time.  Feel free to share the video with your family and friends and, as always, I welcome your comments and emails.  I really want to get to know YOU and what YOU want to see!


Pick what's best for you:


See Card Kit details here
October Host Code GZU4ASKR - fall card kits are my gift to you with any size order!  Shop with Nicole Steele

The best combination ever!
The Stampin' Up! Holiday catalog + chocolate = best combination ever!  Email Nicole Steele The Joyful Stamper to request a catalog.


Friday, September 27, 2019

Trio of Adorable Paper Pumpkins!

I fell in immediate love with these cute little pumpkins!  I gave the first set to Emma who wanted them for her dorm room.  I missed them so much that I made a second set and created a tutorial for all of you, friends!  Please excuse my well-loved tools and supplies - I'm sure we all have a few of those, right? 

Trio of Paper Pumpkins by Nicole Steele The Joyful Stamper


 The Supplies You'll Need
Stampin' Up! supplies needed for paper pumpkins by Nicole Steele The Joyful Stamper


 Stamp leaves in Cajun Craze and Crumb Cake on the same color cardstock, using the largest leaf image from the Gather Together set. 
Die-cut leaves with Gathered Leaves coordinating die.
Die-cut scalloped circle from Early Espresso cardstock using Layering Circles dies.
die-cut scalloped circle and leaves using Stampin' Up!'s Layered Circle and Gathered Leaves dies - Shop with Nicole Steele


Cut skinny strips of Garden Green cardstock.
Use bone folder to gently curl.  
use bone folder to curl cardstock to make pumpkin vines - Nicole Steele The Joyful Stamper


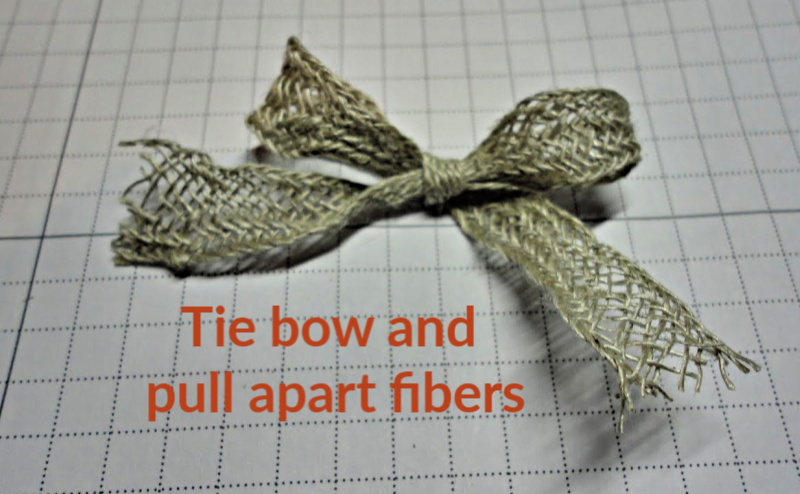
Use Braided Linen Trim to tie a bow.
Gently pull apart fibers to create a more rustic look.
Tie bow with Braided Linen Trim and pull apart fibers to create rustic look - Nicole Steele The Joyful Stamper


To make the pumpkin stems, use a bone folder to soften the fibers of a 1" wide piece of Early Espresso cardstock.  This is the same way you curled the vines above.
Once the cardstock feels soft, start in the corner and peel apart the two layers.  
Use bone folder to soften cardstock fibers - Nicole Steele The Joyful Stamper


Using just one layer of Early Espresso cardstock, roll it diagonally into a stem until it's your desired thickness and length.  You'll want to make the stem long enough that you can bend the bottom a bit and glue it to your pumpkin. Glue to hold together.
Roll cardstock diagonally to create stem and glue together - Nicole Steele The Joyful Stamper

Cut (4) 1" x 12" strips of Designer Series Paper.  Place them wrong pattern up (the pattern that will be on the inside of the pumpkin is the one facing up), as shown in the photo.
Staple together in the center.
Staple 1" x 12" Come To Gather Stampin' Up! Designer Series Paper strips in center - Nicole Steele The Joyful Stamper


Bend the strips up to meet in the center and staple.
Fold up Come To Gather Stampin' Up! Designer Series Paper strips and staple at center - Nicole Steele The Joyful Stamper


Glue the die-cut scalloped circle to the bottom of the pumpkin.
Glue die-cut scalloped circle to bottom of pumpkin - Nicole Steele The Joyful Stamper


Turn the pumpkin right-side up.
Bend the bottom of the stem and glue to the top of the pumpkin.  A hot glue gun is highly recommended for this.
Glue stem to top of pumpkin - Nicole Steele The Joyful Stamper


I forgot to take a photo of the next step!  Glue on the pumpkin vines near the base of the stem.

Now glue on the stamped and die-cut leaves.
Glue on leaves to top of pumpkin - Nicole Steele The Joyful Stamper


Glue on the Braided Linen Trim bow.
Glue on pumpkin vines and bow - Nicole Steele The Joyful Stamper


Ta-da!  You have the cutest, easiest paper pumpkins ever!  I put mine on the window sill above my kitchen sink.
Trio of Paper Pumpkins on display - tutorial by Nicole Steele The Joyful Stamper


Trio of Paper Pumpkins on display - tutorial by Nicole Steele The Joyful Stamper


Don't you love those?  I do!  These would be so fun with the Monster Bash Designer Series Paper.  You could have them sitting near your candy display on trick-or-treat night or displayed on a foyer table.  They would be such a cute decorative touch!

If you loved this tutorial, I would so appreciate you shopping with me.  Shop my online store here and don't forget about the recently updated Clearance Rack - there are some serious bargains there (up to 60% off)!


Shop here with Nicole Steele, The Joyful Stamper

Follow Me on Facebook for More Fun!
Click the image!
Follow Nicole Steele The Joyful Stamper on Facebook!


Wednesday, September 25, 2019

Fall Banner

My oldest daughter Emma requested fall decorations for her dorm room a few weeks ago.  Of course, I got to work!  Today, I'm sharing the banner I made.

Fall banner using Stampin' Up!'s Come To Gather suite by Nicole Steele The Joyful Stamper

I apologize that these photos are not as good as what I have been posting.  The camera was temporarily out of commission so my laptop camera had to do.  The banner is what we should be noticing, anyways!  Don't you love it?!?!  Ever hear of a runner's high?  Well, I had a crafter's high when I made this!
  
"F" and "A" of Gather Together fall banner by Nicole Steele The Joyful Stamper

Confession: I used a retired stamp set called Well-Worn for the letters but the Lined Alphabet (item #145908, pg 159 in the Annual Catalog) would be an even better one to use since it's clear (which makes it easier to see where you are stamping).  You could also use letter stickers, if you have any alphabet ones.

"L" and "L" of fall banner made with Stampin' Up!'s Come To Gather suite by Nicole Steele The Joyful Stamper

Each letter panel uses the same components from the Come To Gather product suite.  They are arranged slightly different on each letter panel, though.  I LOVE how those wooden tree tags set off the letters and add a nice contrast to the other elements.  They are in the Tags & Feather Elements pack (item #150455, pg 47 in the Holiday Catalog).

fall banner components using Stampin' Up!'s Come To Gather suite - shop with Nicole Steele The Joyful Stamper

I began my banner by die-cutting, stamping, punching, and heat embossing all the elements (I did not end up using those Pretty Peacock gingham pumpkins - the pattern was too big for the pumpkin sizes).

fall banner instructions for cutting each pennant - Nicole Steele The Joyful Stamper

I put together a short tutorial for you in the photo above to create each letter panel for the banner.  Stampin' Up!'s Grid Paper comes in handy for this part (item #130148, pg 183 in Annual Catalog)!  

Use a hole punch to make a hole in the top left and top right corners of each panel, then string the Crumb Cake ribbon from the Come To Gather combo pack through the holes (item #150456, pg 47 in the Holiday Catalog).

Isn't that a fun banner?  It took an hour to make it and that included design time, so it would be even faster for you!

Supplies To Make This Fall Banner:
  • Gather Together stamp set (item #150589)
  • Gathered Leaves dies (item # 150662)
  • Gather Together Bundle (includes stamp set and dies listed above at a 10% discount; item # 153036)
  • Come To Gather Designer Series Paper (item #150454)
  • Come To Gather Ribbon Combo Pack (item #150456)
  • Tags & Feather Elements (item #150455)
  • Come To Gather suite (includes everything listed above, orderable with just one number; item #153484)
  • Lined Alphabet (item #145908)
  • Stitched Nested Labels dies (item #149638)
  • Early Espresso cardstock (for the banner panels; item #119686)
  • Pumpkin Pie cardstock (for the pumpkins; item #105117)
  • Versamark ink (to stamp the pumpkins before heat embossing them; item #102283)
  • Pretty Peacock ink pad & cardstock (item #150083 & 150880 )
  • Mint Macaron ink pad & cardstock (item #147106 & 138337 )
  • Merry Merlot ink pad & cardstock (item #147112 & 146979)
  • Cajun Craze ink pad & cardstock (item #147085 & 119684)
  • Leaf Punch (item #144667)
  • Gold Stampin' Emboss Powder (item #109129)
  • Heat Tool (item #129053)
  • Multipurpose Liquid Glue (item #110755)
  • Stampin' Dimensionals (item #104430)
  • Glue Dots (item #103683)
  • Tear N Tape (to adhere wooden tags; item #138995) 
  • Grid Paper (item #130148)
Pick your favorites to order here in my online store.  Use September's Host Code RCRTAFKX on your order and I'll send you a Halloween wreath tutorial that uses our new coffin boxes!  It's my gift to you for shopping with me!

This once-a-year sale ends September 30!
Buy 3, Get 1 Free Designer Series Paper Sale - shop with Nicole Steele


Click image to follow me on Facebook!
Follow The Joyful Stamper - Independent Stampin' Up! demonstrator on Facebook


01 09 10