Showing posts with label free tutorials. Show all posts

Saturday, October 17, 2020

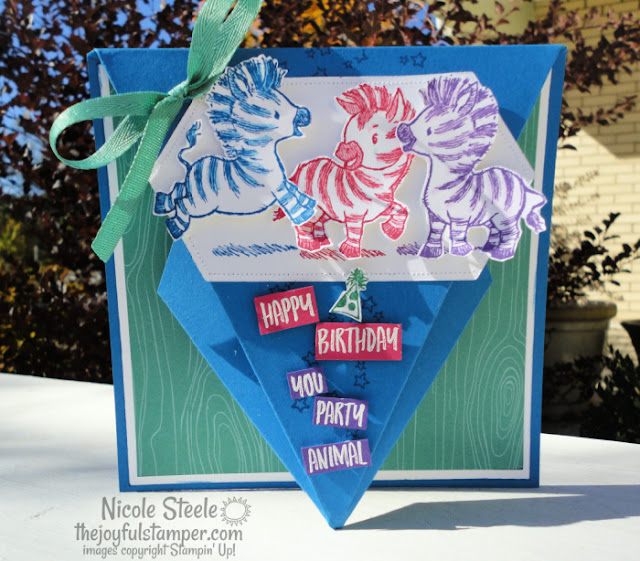
Saturday Card Sketch 823 -Zany Zebras Birthday Card

card sketch, how to make a card, card design, card layout, splitcoaststampers, stampin up, cardmaking, learn to stamp, how to stamp, stamping challenges

There are 2 ways to interpret the sketch this week - as flat triangular layers, or as an Arrow Fold card.  Since the Arrow Fold is new to me, I decided to go that route.  I made a video and wrote a tutorial so that you could make one, too!


zany zebras, arrow fold, card fun folds, stampin' up!, birthday card, handmade cards, how to make a card, how to stamp, learn to stamp, hobbies, nicole steele, independent stampin' up! demonstrator from pittsburgh pa, the joyful stamper, free stamping tutorials, card instructions

The Arrow Fold is pretty easy - it's just few diagonal score lines folded into that triangular shape.  Then you use adhesive to keep the folds shut.

🌞Joyful Stamper Tip: save paper by die-cutting pieces from the center of your cardstock mats.  In this card, I die-cut the Stitched Nested Label that the zebras are on from the center of the Whisper White mat.  The cut-out portion is covered by the Just Jade Designer Series Paper.

zany zebras, arrow fold, card fun folds, stampin' up!, birthday card, handmade cards, how to make a card, how to stamp, learn to stamp, hobbies, nicole steele, independent stampin' up! demonstrator from pittsburgh pa, the joyful stamper, free stamping tutorials, card instructions

  • Cut the card base to 5-1/2"x11" and score in half on the long side at 5-1/2"
  • Mark the short side at 2-3/4".
  • Mark the left and right long sides at 1-7/8", 3-3/4", and 5-1/2".
  • Score from the 2-3/4" mark to each of the marks on the long side, both left and right sides.  You'll have 6 diagonal score lines when you are finished (3 on the left and 3 on the right), all radiating from the 2-3/4" mark.
  • Watch the video to see how it's done!

zany zebras, arrow fold, card fun folds, stampin' up!, birthday card, handmade cards, how to make a card, how to stamp, learn to stamp, hobbies, nicole steele, independent stampin' up! demonstrator from pittsburgh pa, the joyful stamper, free stamping tutorials, card instructions

Zany Zebras makes the cutest cards!  I wanted something fun and bright for my twin nephews' 6th birthdays.  After stamping the zebras, I went over them with a Blender Pen to fill in the image a bit with the stamped ink.  This is one of my all-time favorite techniques!  Add a pack of Blender Pens to your next order and give it a try - you'll see why it's a favorite! 


Pin, print, or save the tutorial for this card.  Measurements and supply list are included in the tutorial.

free stamping tutorial, how to make a card, how to stamp, stampin' up!, nicole steele, the joyful stamper, independent stampin' up! demonstrator


zany zebras, arrow fold, card fun folds, stampin' up!, birthday card, handmade cards, how to make a card, how to stamp, learn to stamp, hobbies, nicole steele, independent stampin' up! demonstrator from pittsburgh pa, the joyful stamper, free stamping tutorials, card instructions


👇👇👇👇👇
Place a $35 order (before shipping and tax) in my store by midnight Sunday October 18 and I'll send you the packets to make my Facebook Live projects from Thursday's class.  You must use the October Host Code 4JHNU9Z when ordering. 


GIVEAWAY!  Sign up in October to receive Paper Pumpkin and be entered to win a 1 month Paper Pumpkin prepaid code!  Subscribe with me (Nicole Steele) to be entered.

november paper pumpkin, christmas kit, jolly gingerbread, monthly stamp kit, papercraft kit, stamping kit, cardmaking kit, stampin' up!, paper pumpkin, hobbies, scrapbooking, stamping

Designer Series Paper Sale

October 1 - 30 | Shop your favorites!

patterned paper, paper sale, craft supplies sale, craft sale, stampin' up! sale, designer series paper sale, nicole steele, the joyful stamper, independent stampin' up! demonstrator from pittsburgh pa


If you are enjoying The Joyful Stamper site

  • Request a catalog package here, if you don't already have a demonstrator you love.
  • Subscribe to Stampin' News, a weekly email that delivers fun, tips, and specials right to you.  Get a free exclusive Stampin' News Subscriber pdf tutorial as a sign-up thank you!
  • Shop my store and to save money check out the Clearance Rack and Discounted Bundles.
  • Use this month's Reward Code to earn points towards a $50 shopping spree - read the details here.
  • Join me every Thursday at 11 AM ET for my weekly Happy Half Hour Live stamping show on my Facebook page.  


Joy in being creative, community in sharing a common interest, purpose in what we make - this is stamping at its best!  Thank you, friends, for choosing me as your demonstrator!

Nicole Steele, Owner of The Joyful Stamper, Independent Stampin' Up! Demonstrator


Saturday, June 13, 2020

Saturday Sketch + Card Video & PDF Tutorial

My brother and his family stayed with us in our itty bitty one-story 1200 square feet home this week and it was crazy!  Crazy in a super fun way, though.  I love my niece and twin nephews.  They are 7, 5 and 5.  Those ages are so healing and healthy for an adult to take his or her mind off the cares of the world.  What's more important this morning than playing a Wii Mario Kart tournament?  Nothing?  Or what's more important this evening than roasting a marshmallow over a campfire for a s'more?  Nothing!


card sketch 805 splitcoaststampers stamping challenges nicole steele the joyful stamper independent stampin' up! demonstrator

Using a sketch like this week's from Splitcoaststampers is a timesaver in week's like this past one where there wasn't much time to create.  There's even a forum thread to post a photo of what you make with the sketch, or to gallery gaze at what others did with it.


free as a bird card sketch stamping challenges stampin' up! handmade cards thinking of you nicole steele stampin' up! independent demonstrator the joyful stamper

I loved the idea of combining the Buffalo Check background stamp with Free As A Bird.  The images were colored with Stampin' Blends, as were the pearls.  

Did you know you could color pearls, rhinestones, and ribbons with Stampin' Blends?  Since the Blends are alcohol inks, they can be used on both porous and non-porous surfaces.  I love that ability to have embellishments in whatever Stampin' Up! color I need!

Knowing people learn by different methods, I've created both a video and a written tutorial for this week's sketch card.  Enjoy!


stamping tutorials card sketch challenges free as a bird buffalo check background stamps stampin' up! nicole steele the joyful stamper independent stampin' up! demonstrator


Friend Like You Online Class
Sunday, June 14 8 PM (ET)
Details here.
friend like you stampin' up! online stamp classes facebook group nicole steele the joyful stamper independent stampin' up! demonstrator


Mystery Stamping Hour
Next one is Sunday June 28 at 8 PM (ET)
Open and free to everyone!  Details here.


If you are enjoying The Joyful Stamper site

  • Request a catalog package here, if you don't already have a demonstrator you love.
  • Subscribe to Stampin' News, a weekly email that delivers fun, tips, and specials right to you.  Get a free exclusive Stampin' News Subscriber pdf tutorial as a sign-up thank you!
  • Shop my store and to save money check out the Clearance Rack and Discounted Bundles.
  • Use this month's Reward Code to earn points towards a $50 shopping spree - read the details here.
  • Join me every Thursday at 11 AM ET for my weekly Happy Half Hour Live stamping show on my Facebook page.  


Joy in being creative, community in sharing a common interest, purpose in what we make - this is stamping at its best!  Thank you, friends, for choosing me as your demonstrator!


Monday, February 17, 2020

Parisian Blossoms Magnificent Adventure + Free Tutorial

Good Monday morning, friends!  I have a sweet story for you that hopefully starts your week off on a happy note.  My grandmother fractured a disc in her back and has been in the hospital almost three weeks.  Friday was her 89th birthday (yes, she's a Valentine's Day baby) and when I called her hospital room to wish her a happy birthday, it was noisy and sounded like a party was going on.  I asked her about it and she told me my parents were there, both my aunts and uncles (her other son and daughter and their spouses), and my cousin.  They'd brought a cake with plates and utensils, balloons, and flowers.  PLUS the hospital staff came around to sing to her and give her a cake.  PLUS a volunteer group sang to her and gave her cupcakes.  My grandma - bedridden in the hospital for almost three weeks with a fractured disc and several infections and turning 89 years old - said excitedly, "This is the best birthday I've ever had!"  Isn't that cute?

Parisian Blossoms suite card | Parisian Blossoms Designer Series Paper | Champagne Foil

It was a marathon stamp session Saturday and this is one of the projects that came from it.  I LOVE LOVE LOVE the Parisian Blossoms Specialty Designer Series Paper (DSP)!  There was no way to pick a single pattern so I chose three and created a block layout to highlight them.

Parisian Blossoms suite card | Parisian Blossoms Designer Series Paper | Champagne Foil

Each DSP piece is cut to 2-3/4" x 2-1/8" and adhered with Multi Purpose Liquid Glue to a 4-1/4"x11" Thick Very Vanilla cardstock base.  

Parisian Blossoms suite card | Parisian Blossoms Designer Series Paper | Champagne Foil

A 3"x4" Champagne Foil piece is  tucked behind a 5-1/2"X2-3/8" piece of Vellum cardstock.  I love how the Champagne Foil picks up the champagne on the ribbon edge and in the rhinestone!  The Eiffel Tower is a die from the Parisian Dies that coordinate with the Parisian Blossoms stamp set (bundle them together and save 10%).  I used Cherry Cobbler cardstock to cut this out.  If you use this trick, the little pieces pop out easily.

Parisian Blossoms suite card | Parisian Blossoms Designer Series Paper | Champagne Foil

The greeting is from Parisian Blossoms and is stamped on a strip of Petal Pink cardstock in Pool Party ink.  I used a Bone Folder to curve the greeting strip and adhered it with Stampin' Dimensionals.  The Petal Pink Metallic Edge Ribbon is tied in a bow and anchored to the sentiment strip with a Mini Glue Dot.  A Champagne Rhinestone Basic Jewel adds a simple hint of sparkle.  **I'm just now seeing I left one little itty bitty piece in the die-cut.  I realize some of you are itching to reach into the screen and poke it out and I'll apologize right now for that bit of stamping indiscretion 😊**

Click any of the images below to shop for these pretties!
Read on for the free tutorial I have just for you!

Parisian Blossoms Specialty Designer Series Paper | item 151192 | Stampin' Up! 2020 Mini Catalog

Petal Pink Metallic Edge Ribbon | item 151194 | Stampin' Up! 2020 Mini Catalog

Champagne Rhinestone Basic Jewels | item 151193 | Stampin' Up! 2020 Mini Catalog

Champagne Foil | item #144748 | Stampin' Up! 2019-2020 Annual Catalog

Click the image for a tutorial you can pin, download, or print.
Free tutorial for Parisian Blossoms Life is a Magnificent Adventure card | by Nicole Steele The Joyful Stamper Independent Stampin' Up! Demonstrator


If you are enjoying The Joyful Stamper site

  • Want a catalog and don't already work with a demonstrator you love?  Request a free catalog package by emailing me at nicole@thejoyfulstamper.com or via this form.
  • Never miss a beat in the stamping world - subscribe to The Joyful Stamper Stampin' News, a weekly email that specially delivers fun, tips, and specials right to you.  Sign up and get a free exclusive Stampin' News Subscriber pdf tutorial as a thank you!
  • Stamping is more fun with pretty products you can count on.  Shop my store anytime to give yourself the best crafting experience.
  • You'll love my crafting videos on The Joyful Stamper YouTube channel!  Subscribe while you're there and click the bell so that you always have fresh inspiration.
  • Looking for community, a hobby, or a way to make extra money?  My team of My Joyful Stampers has a place for you (and the Starter Kit is the especially ULTIMATE bargain right now)!  Read more here.

Thank you for choosing me as your demonstrator!  I appreciate your business!


Monday, February 10, 2020

The Joyful Stamper Stampin' News

There's a new way to get your Stampin' News!

Subscribe to The new Joyful Stamper Stampin' News weekly newsletter | free exclusive pdf tutorial as a special thank you
Starting today, you can get The Joyful Stamper Stampin' News delivered straight to your inbox!  

  • Stay better informed and in a more timely fashion (no more missed Clearance Rack Updates
  • Stamping tips, tricks, & techniques
  • Inspiring color combinations 
  • Exclusive pdfs for Stampin' News subscribers 
  • And other surprises 

You'll never have to hunt for these or wonder if you missed seeing them on my blog!  It's personal service, delivered straight to you.  And as a thank you for subscribing, a free pdf exclusive to Stampin' News subscribers will be delivered to your inbox.  I'm so grateful for YOU and I love showing my appreciation!

Subscribe to The new Joyful Stamper Stampin' News weekly newsletter | free exclusive pdf tutorial as a special thank you

If you are enjoying The Joyful Stamper site

  • Want a catalog and don't already work with a demonstrator you love?  Request a free catalog package by emailing me at nicole@thejoyfulstamper.com or via this form.
  • High-quality stamping products make your crafting experience better so don't cheat yourself!  Shop my store for your crafting supplies!
  • Never miss a beat in the stamping world - subscribe to The Joyful Stamper Stampin' News, a weekly email that specially delivers fun, tips, and specials right to you.  Sign up and get a free exclusive Stampin' News Subscriber pdf tutorial as a thank you!
  • You'll love my crafting videos on The Joyful Stamper YouTube channel!  Subscribe while you're there and click the bell so that you always have fresh inspiration.
  • Looking for community, a hobby, or a way to make extra money?  My team of My Joyful Stampers has a place for you (and the Starter Kit is the especially ULTIMATE bargain right now)!  Read more here.

Thank you for choosing me as your demonstrator!  I appreciate your business!

Wednesday, January 8, 2020

Ooh La La!

I'm an armchair traveller.  Yes, I go places (Alaska and Las Vegas in the last 4 months) but my strong preference is to stay home.  Everything I love most is here!  The great thing about this personality quirk is that I will listen to your travel stories and look at your travel photos for as long as you like because I genuinely enjoy hearing about others' adventures.  So set that projector up, load up the slides, and invite me over!  

Wait, I think I'm in the wrong decade with that sentence.  Not having a cell phone, I get confused at times and think I'm back in the '80s.

splitcoaststampers sketch challenge 782

Parisian Beauty is all the Paris I need.  It's part of Stampin' Up!'s Parisian Blossoms suite, found on page 14 in the Mini Catalog (don't have a copy?  Click here to see it online or to request a free catalog package).  My card today features this suite and uses last week's Splitcoaststampers Sketch Challenge.


thank you/merci card featuring stampin' up!'s parisian blossoms suite | by Nicole Steele The Joyful Stamper

I just realized I did not stamp at all on this card!  I did, however, use the Parisian dies, which coordinate with the stamp set.  Look at the detail of the Eiffel Tower die!  I die-cut it with Champagne Foil paper to match the Champagne Rhinestones Basic Jewels.  I also sprinkled in a few Holiday Rhinestones Basic Jewels in Pool Party.  ❤

thank you/merci card featuring stampin' up!'s parisian blossoms suite | by Nicole Steele The Joyful Stamper

The "merci" is also a die from the Parisian set.  I cut three from Petal Pink cardstock, then glued them together using a Fine-Tip Glue Pen.  I like the lift and attention that trick gives.

thank you/merci card featuring stampin' up!'s parisian blossoms suite | by Nicole Steele The Joyful Stamper

A swirl die-cut with Pool Party cardstock and a sweetly tied Petal Pink Metallic-Edged Ribbon add elegant detail.  I also used a Stampin' Sponge to apply Soft Suede ink to the edges of the Parisian Blossoms Designer Series Paper.

click here for free tutorial for Parisian Blossoms merci card by Nicole Steele The Joyful Stamper

Don't forget about my Facebook Live special!
From My Heart Valentine projects from my Happy (Half) Hour Facebook Live | Nicole Steele The Joyful Stamper

Any order of $35 or more (before shipping and tax) receives the project kits to make both of the
candy holders!  Use Host Code 349VN7VY and be sure to place your order by Midnight ET Friday, January 10, 2020!

If you enjoy my blog, tutorials, videos, and tips, please consider choosing me as your demonstrator.  My goal is to give you a fantastic stamping experience!


Monday, October 14, 2019

Hershey Nugget Cakes - Facebook Live Video

It's a tradition for me to make Hershey Nugget Cakes for each of my three girls to take into school.  They pull them out at lunch time and their friends go crazy!  Instant popularity.  Friends bought.  Mission accomplished.  

That was a joke - I am not trying to buy friends for my girls!  I just need an excuse to buy Hershey nuggets and making these cakes is it.


Emma's cake 
Halloween Hershey Nugget Cake using Stampin' Up' Monster Bash product suite

Alaina's cake
Halloween Hershey Nugget Cake using Stampin' Up' Monster Bash product suite

Caitlin's cake
Halloween Hershey Nugget Cake using Stampin' Up' Monster Bash product suite


There's no need for me to write a tutorial - I'll link you to the one I followed.  

Nugget Cake

My rings for the cake tiers are 1" wide strips cut from cereal boxes.  I cut three: 10", 8", and 6" in length.  Each was formed into a circle with the ends stapled together.  I fit 6 nuggets on the top tier, 8 on the middle tier, and 10 on the bottom tier.  It depends on how you staple the ends together, though.  You may fit 7, 9, and 11 on your tiers.


Halloween Hershey Nugget Cake using Stampin' Up' Monster Bash product suite
The top uses the Spooktacular Bash bundle of stamps and dies plus Monster Bash Enamel Shapes and Basic Black Scalloped Ribbon.  I colored in the images with Stampin' Blends alcohol markers.  That little ghost makes me smile every time - he's SO CUTE!


Halloween Hershey Nugget Cake using Stampin' Up' Monster Bash product suite

To get the images to stay standing, I taped toothpicks to the backs of the ghost and Dracula pieces.  The sentiment has a paper "easel" glued to its back.


Halloween Hershey Nugget Cake using Stampin' Up' Monster Bash product suite

There were gaps in my tiers where I couldn't fit another nugget but the cardboard ring was exposed.  To hide that, I added some frames and stamped images from the Spooktacular Bash Bundle.  The images were colored with Stampin' Blends alcohol markers, too.

Tear 'N Tape and lots of hot glue were used to hold these cakes together.  LOTS of hot glue!  In some of the photos you can see the hot glue.  I don't aim for perfection when I make something - I aim for joy!  Joy in the making, joy in the giving, and joy in the receiving!

I did a Facebook Live last week showing off all my Halloween projects (more than just these cakes).  Every project I show in my Live has a printable tutorial for you.  They are on my blog here.  My excitement in the video is a little over-the-top but I REALLY love this stuff!


As always, I am grateful for you choosing me as your demonstrator.  My aim is for you to have the BEST stamping experience - it's a job I absolutely love!  Thank you for ordering with me!

Spooktacular Bash bundle (10% discount)

Monster Bash Enamel Shapes

Monster Bash Designer Series Paper

Basic Black Scalloped Ribbon

Stampin' Blends alcohol markers


Shop with me here
Shop Stampin' Up! with demonstrator Nicole Steele


Catalogs at no charge!  Email me


Friday, October 11, 2019

Faux Wood Technique

I saw the Faux Wood Technique here for the first time and fell in love with the look.  


Stampin' Up!'s Beauty & Joy handmade fall card using Faux Wood Technique

Then, like I usually do, I made a mistake here and there in the execution!  It turned out fine, though, and since I was gleefully praising myself as I was playing, I decided to make a photo tutorial for you all!  My steps are a bit different than the original tutorial because of my mistakes, which I ended liking.  

I have another card example using this technique at the end of this post!

Faux Wood Technique Photo Tutorial


Choose 3 colors that are a light, medium, and dark of each other, plus Whisper White.  Oh, and that Close to Cocoa ink pad is really Soft Suede.  I kept the pad when the color retired and just reink it with Soft Suede.
card making technique photo tutorial: Faux Wood Technique

Add your lightest color first, which is Crumb Cake here.
card making technique photo tutorial: Faux Wood Technique

This is the way to add the ink in each step to your cardstock.  It's called the direct-to-paper method.  Place your ink pad at the edge of your cardstock, then drag it across.
card making technique photo tutorial: Faux Wood Technique

Add next darkest color, which is Soft Suede here.
card making technique photo tutorial: Faux Wood Technique


Add darkest color next, which is Early Espresso here.  And, yes, you can use your mini ink pads for the direct-to-paper method!
card making technique photo tutorial: Faux Wood Technique

Wait a minute to give the previous applications of ink time to dry, then add Whisper White ink.  I did get a tiny amount of brown ink on my pad, but it's fine!  You can blot it out with a paper towel or be like me and just leave it (I think it's evident from these photos that my supplies are well-used!).
card making technique photo tutorial: Faux Wood Technique

We've made our faux wood cardstock - isn't it wonderful?!  Now it's time to cut our frames.  If your dies are able to nest inside each other, you can do the next three steps at once.
card making technique photo tutorial: Faux Wood Technique


card making technique photo tutorial: Faux Wood Technique


card making technique photo tutorial: Faux Wood Technique

Place the smaller frame inside of the larger frame.  
card making technique photo tutorial: Faux Wood Technique

LOVE!!!  Don't you love that look?  **swoon**  That fabulous wood grain paper in the background is from the Come To Gather DSP.  I pulled on the Copper Ribbon Trim to get a full look.

close-up of Faux Wood Technique on handmade cards using Stampin' Up!'s Beauty & Joy set

I loved the Faux Wood Technique so much that I made a second card.

Stampin' Up!'s Beauty & Joy handmade fall card using Faux Wood Technique


Instead of squares, I used stitched rectangles for the frames.  You could use Stitched Shapes dies to get square, circle, and oval frames, too.

close-up of Faux Wood Technique on handmade cards using Stampin' Up!'s Beauty & Joy set

The leaf die is from Gathered Leaves dies (as is the Crushed Curry one in my first card on which I stamped the sentiment).  I pressed the leaf die into a Delicata Gold Glitz ink pad then ran it through my machine with Cajun Craze cardstock.  


close-up of Faux Wood Technique on handmade cards using Stampin' Up!'s Beauty & Joy set


The multi-colored leaves were SO easy to create.  I scribbled on the stamp with Stampin' Write markers, breathed on it to rewet the ink, then stamped on Very Vanilla cardstock.  I used my Stampin' Write markers lightest to darkest: Crushed Curry, Pumpkin Pie, Cherry Cobbler.  

Layering Squares dies (item #141708)

Stitched Shapes dies (item #145372)

Gathered Leaves dies (item #150662)

Delicata Golden Glitz ink (item #150711) *currently on backorder but still orderable

Stampin' Write Markers -Regals (item #147155)

Beauty & Joy stamp set (item #150518) **one of my Top 10 picks!**

Copper Trim (item #144179)

Come To Gather Designer Series Paper (item #150454*currently on backorder but still orderable

Thank you for choosing me as your demonstrator!  It's always my goal to give you your best crafting experience.  Your support lets me know that you ARE having your best crafting experience!   

Shop my online store here
Shop Stampin' Up! products with demonstrator Nicole Steele The Joyful Stamper

Catalogs for you at no charge!  Email me.
Stampin' Up! Holiday 2019 catalog online copy with demonstrator Nicole Steele The Joyful Stamper


01 09 10