Showing posts with label perfectly plaid. Show all posts

Thursday, November 5, 2020

Creativity Kit Sneak Peek of Bonus Ideas - Facebook Live

 Every Thursday at 11 AM ET I go live on The Joyful Stamper Facebook Page.  Everyone is invited for some stamping fun!  After the Live class, I'll post the replay below.  This week I'm showing you sneak peeks of 2 of the Bonus Ideas from November's Creativity Kits.  They're SO pretty!


perfectly plaid, christmas cards, stamp kits, online stamp classes, stamp class at home, learn to stamp, learn to make cards, stampin' up, nicole steele, independent stampin' up! demonstrator, the joyful stamper

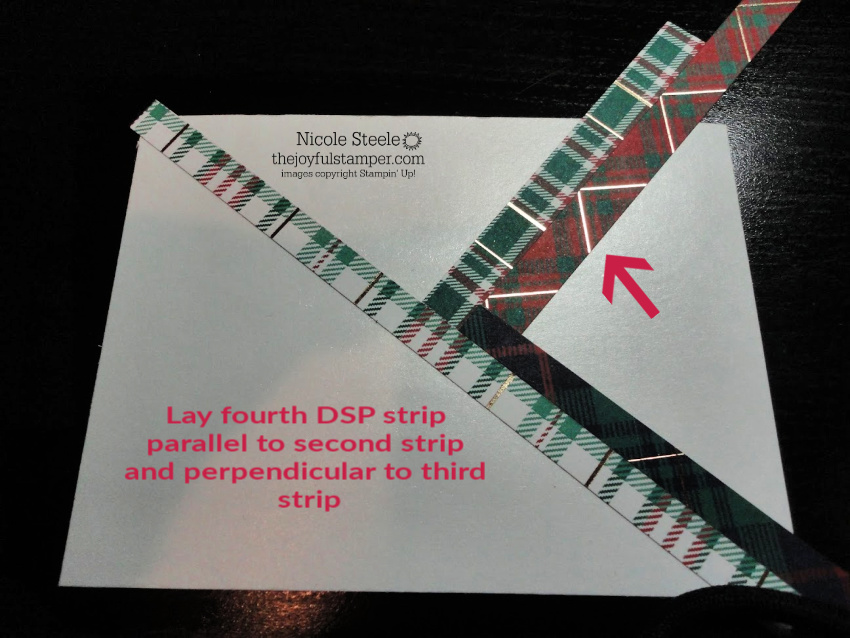
The first Creativity Kit features Perfectly Plaid and the Pine Tree Punch.  There's SO much mileage to be had from these 2 products!  Each kit includes at least $20 of Stampin' Up! product, class packets to make 4 stepped-up cards, a PDF of written instructions, 4 class videos that you can watch whenever you like, at least 2 Bonus Ideas, plus my signature treat.

snowflake splendor, snowflake wishes, christmas cards, stamp kits, online stamp classes, stamp class at home, learn to stamp, learn to make cards, stampin' up, nicole steele, independent stampin' up! demonstrator, the joyful stamper

You also have the option to add on the bundle at catalog price - I pay the shipping & tax for you!

The second Creativity Kit for this month features the Snowflake Splendor suite and Snowflake Wishes Bundle.  My jaw was hitting the floor as I designed the cards!


πŸ‘‡πŸ‘‡πŸ‘‡πŸ‘‡πŸ‘‡
Use the special code mentioned in the Live when you email me your Creativity Kit registration and I'll send you the Bonus Idea packet for your kit!  Order both Creativity Kits and save $5 and get the packets for BOTH these Bonus Ideas!


Registration is open until November 10.  Read the details here.

snowflake wishes, snowflake splendor, christmas cards, stamp kit, stamp class, online stamp class, learn to stamp, how to make a card, learn to make a card, how to stamp, learn stamping techniques, stampin' up!, nicole steele, the joyfulstamper, independent stampin' up! demonstrator from pittsburgh pa

perfectly plaid, christmas cards, pine tree punch, stamp kit, stamp class, online stamp class, learn to stamp, how to make a card, learn to make a card, how to stamp, learn stamping techniques, stampin' up!, nicole steele, the joyfulstamper, independent stampin' up! demonstrator from pittsburgh pa


If you are enjoying The Joyful Stamper site

  • Request a catalog package here, if you don't already have a demonstrator you love.
  • Subscribe to Stampin' News, a weekly email that delivers fun, tips, and specials right to you.  Get a free exclusive Stampin' News Subscriber pdf tutorial as a sign-up thank you!
  • Shop my store and to save money check out the Clearance Rack and Discounted Bundles.
  • Use this month's Reward Code to earn points towards a $50 shopping spree - read the details here.
  • Join me every Thursday at 11 AM ET for my weekly Happy Half Hour Live stamping show on my Facebook page.  


Joy in being creative, community in sharing a common interest, purpose in what we make - this is stamping at its best!  Thank you, friends, for choosing me as your demonstrator!

Nicole Steele, Owner of The Joyful Stamper, Independent Stampin' Up! Demonstrator


Tuesday, November 3, 2020

2 New November Creativity Kits - Snowflake Splendor & Perfectly Plaid

I've got 2 Creativity Kits for you this month and both are Christmas-themed!  Each Creativity Kit is $35 but if you order BOTH kits, you'll save $5!  The deadline to register is Tuesday, November 10.  Email me at nicole@thejoyfulstamper.com to register.  

snowflake wishes, snowflake splendor, christmas cards, stamp kit, stamp class, online stamp class, learn to stamp, how to make a card, learn to make a card, how to stamp, learn stamping techniques, stampin' up!, nicole steele, the joyfulstamper, independent stampin' up! demonstrator from pittsburgh pa

Snowflake Splendor Creativity Kit includes:

  • 4 card project kits - all pieces are cut and embossed for you (other than what you'll use your Snowflake Wishes dies for)
  • $20 of Stampin' Up! product
  • Bonus ideas to continue using your kit pieces
  • PDF of written tutorials
  • link to recorded class videos creating the kit projects at a relaxed, slower pace - I want you to feel like we're stamping together!
  • Earn 1 Joyful Stamper Reward Point for every 3 months you order Creativity Kits
  • Kit shipping is included in the price
  • The option to add on the Snowflake Wishes Bundle for just the catalog price.  I pay shipping and tax!
To complete the kit, you will need a die-cutting machine to use with the dies.  

Inks used are Balmy Blue, Night Of Navy, Highland Heather, Pool Party, and Memento Tuxedo Black ink.  

Adhesives used are Multipurpose Liquid Glue, Mini Glue Dots, and Stampin' Dimensionals.

You can use the inks and adhesives you have (they are not included in the kit) or order them here.


perfectly plaid, christmas cards, pine tree punch, stamp kit, stamp class, online stamp class, learn to stamp, how to make a card, learn to make a card, how to stamp, learn stamping techniques, stampin' up!, nicole steele, the joyfulstamper, independent stampin' up! demonstrator from pittsburgh pa


Perfectly Plaid Creativity Kit includes:

  • 4 card project kits - all pieces are cut and embossed for you (other than what you'll use your Pine Tree Punch for)
  • $20+ of Stampin' Up! product
  • Bonus ideas to continue using your kit pieces
  • PDF of written tutorials
  • link to recorded class videos creating the kit projects at a relaxed, slower pace - I want you to feel like we're stamping together!
  • Earn 1 Joyful Stamper Reward Point for every 3 months you order Creativity Kits
  • Kit shipping is included in the price
  • The option to add on the Perfectly Plaid stamp set and Pine Tree Punch for just the catalog price.  I pay shipping and tax!

Inks used in the  projects are: Shaded Spruce, Cherry Cobbler, Garden Green, and Soft Suede

Adhesives used in the  projects are: Mini Glue Dots, Multipurpose Liquid Glue, Stampin' Seal, and Stampin' Dimensionals.

You can use the inks and adhesives you have (they are not included in the kit) or order them here.

How to Get a Joyful Stamper Creativity Kit

Email me at nicole@thejoyfulstamper.com by November 10 for this month's kits.  Kits are $35 each.  If you'd like to add on the stamp set or Bundle, please include that in your email.  A PayPal payment request will be sent to your email and must be paid within 24 hours.  You do not need a PayPal account to pay - credit and debit cards can be used to pay the invoice.

πŸ‘‰The kits will ship by November 24.  If a product backorder delays the shipping of the kits, I will clearly and immediately communicate that to you.  Similar substitutions may need to be made if products become unorderable.πŸ‘ˆ

If you are enjoying The Joyful Stamper site

  • Request a catalog package here, if you don't already have a demonstrator you love.
  • Subscribe to Stampin' News, a weekly email that delivers fun, tips, and specials right to you.  Get a free exclusive Stampin' News Subscriber pdf tutorial as a sign-up thank you!
  • Shop my store and to save money check out the Clearance Rack and Discounted Bundles.
  • Use this month's Reward Code to earn points towards a $50 shopping spree - read the details here.
  • Join me every Thursday at 11 AM ET for my weekly Happy Half Hour Live stamping show on my Facebook page.  


Joy in being creative, community in sharing a common interest, purpose in what we make - this is stamping at its best!  Thank you, friends, for choosing me as your demonstrator!

Nicole Steele, Owner of The Joyful Stamper, Independent Stampin' Up! Demonstrator

Saturday, July 4, 2020

Saturday Sketch + Video + Written Tutorial

Happy Fourth of July to my American stamper friends!  The Revolutionary War period and the people who founded our country have been the historical subjects I've read the most about.  It absolutely fascinates me. I wish I could time travel back to that era (for a short while - I do enjoy our modern medical treatments)!

Splitcoaststampers Card Sketch 808

As usual, the weekly sketch comes from Splitcoaststampers.  Now you know me - I love a card with layers.  I mean, Stampin' Up! has SO many pretty papers that I I look for every opportunity to use as much as I can!  And this sketch is perfect for that.  Let's dive in and see what I did!

perfectly plaid, christmas, pine trees, pine tree punch, coloring, alcohol markers, Stampin' Blends, stampin' up!, stampin' up! demonstrator

You may think that the patterned paper came colored, but no!  That is a piece of Ornate Garden Designer Series Paper that was white with gold foiled flowers.  I colored the flowers in with a Dark Cherry Cobbler Stampin' Blend and the leaves with a Dark Shaded Spruce Stampin' Blend!  Isn't it STUNNING?  And if you're worried about coloring on the gold foil - don't!  Tip: Just use your Color Lifter to go over those spots and the color will come right off.  

And then to lay a Square Vellum Doily over it - someone pick me up off the floor!

After I'd finished coloring and die-cutting and gluing and stamping, I took a step back and thought, "Hmmm....it looks a little bare above the doily....let's tuck a few stamped and punch pine trees there."  And I LOVED it!  I actually congratulated myself out loud - so shameless.  

Another thing I stumbled upon that looks fantastic - Just Jade and Merry Merlot for Christmas colors.  Yes!


Pin to your color board or save to your device
color inspiration, stampin' up! colors, just jade, merry merlot, pinnable color combinations, stampin' up!


Save or print the written tutorial - just click the image below


Watch the video to see how to make this card


Shop from now through August 3 to earn $5 coupons - no limit!  And you can earn Joyful Stamper Rewards, too!
stampin' up! promotions, bonus days, stamping coupons, stamping sales, stampin' up! demonstrator

If you are enjoying The Joyful Stamper site

  • Request a catalog package here, if you don't already have a demonstrator you love.
  • Subscribe to Stampin' News, a weekly email that delivers fun, tips, and specials right to you.  Get a free exclusive Stampin' News Subscriber pdf tutorial as a sign-up thank you!
  • Shop my store and to save money check out the Clearance Rack and Discounted Bundles.
  • Use this month's Reward Code to earn points towards a $50 shopping spree - read the details here.
  • Join me every Thursday at 11 AM ET for my weekly Happy Half Hour Live stamping show on my Facebook page.  


Joy in being creative, community in sharing a common interest, purpose in what we make - this is stamping at its best!  Thank you, friends, for choosing me as your demonstrator!

Nicole Steele, Owner of The Joyful Stamper, Independent Stampin' Up! Demonstrator


Monday, December 16, 2019

Being a Busy Little Stamper Part 1

Hello, friends!  What a weekend the Steele family had!  It started off with some fantastic pizza Friday night and what made it extra-special is that ALL 5 OF US were present.  With Emma off at college, it's rare now for us all to eat dinner together.  Our stomachs hurt from laughing so hard at the stories we told and it was beautiful. 

Saturday night Brian and I went out with some college friends.  Even though we all live near each other, we hadn't hung out in over a year.  It was another night of hearty laughs (my abs are getting a great workout) but I noticed I was pooping out around 8:30!  I am a morning person (between 4 and 5 AM is my natural alarm clock), so that should not have surprised me, but I felt incredibly rude yawning every 2 minutes.  A spirited game of Taboo kept me going until 11 PM, though.  The beauty of being in the company of long-time friends is that they know, accept, and love you. 

To top off the weekend, I stamped a LOT!  Take a look at the first three projects:


Christmas tree made with Stampin ' Up! mini ornament punch | Nicole Steele The Joyful Stamper

It was Virtual Stamp Night over at Splitcoaststampers.  It is SUCH a fun event to kick-start your mojo and you end up with a huge pile of cards when it's over.  I stamped with no agenda for this event, so yes, my cards use retired Stampin' Up! product.  Why not?  It's still fun, it's still pretty, and I bet some of you still have these products and love them, too!  

In the above card, I used a mini ornament punch that co-ordinated with the Merry Minis stamp set to punch out a pile of ornaments in various colors.  I arranged them into a Christmas tree and added a sentiment in Real Red from Snowman Season.  A little sponging around the edges with Soft Suede ink and a Stampin' Sponge added a vintage flair.  The ornaments are brushed with Clear Wink of Stella.  Cardstock colors: Crumb Cake, Pineapple Punch, Blueberry Bushel, Mango Melody, Real Red, and Call Me Clover.

Stampin' Up! Perfectly Plaid framed card | Nicole Steele The Joyful Stamper

Aaahhh, this card.....this card makes my soul sing!  The mix of patterns from the Wrapped In Plaid paper stack, the 3 strands of linen thread tied in a bow, and the Ice Stampin' Glitter that frosts the Perfectly Plaid trees are lovely to me.  See the stitched scalloped rectangle?  That die is from a new set called Sweetly Stitched dies in the upcoming Mini Catalog.  It really is so sweet!  (Speaking of the catalog, I cannot WAIT for you to see the inside!!!  I'll be doing a catalog walk-through January 3 when it goes live.)


Stampin' Up! Toile Tidings card with Toile Tidings glitter enamel dots| Nicole Steele The Joyful Stamper
  
Then we have the classic cardinal from Toile Tidings.  He's stamped in Memento Tuxedo Black ink on Real Red cardstock.  To get the Real Red cardstock in the background soft and sueded, I ran a bone folder repeatedly over a piece of it until it was very soft.  Then I peeled it into two layers.  Try it!  You'll love the look.  The branch is colored with Stampin' Blends alcohol markers.  I added Toile Tidings glitter enamel dots for some sparkle and color.

I have 3 more projects to show you from my Virtual Stamp Night marathon later this week.  I promise you'll love them so be sure to stop back.  Even better, put your email into the subscribe box and you'll get my posts right in your inbox.


Mark your calendar for January 3 - that's when the Mini and Sale-A-Bration catalogs go live and I'll be doing a live walk-through!  Follow me on Facebook here.  Do you have a copy to follow along in?  If not and you aren't already working with a demonstrator you love, request a catalog.  You can also email me at nicole@thejoyfulstamper.com to request a catalog package.  You'll love the happy mail!


Stampin' Up! January-June 2020 Mini Catalog | request a copy from Nicole Steele The Joyful Stamper

Stampin' Up! Sale-A-Bration 2020 Catalog | request a copy from Nicole Steele The Joyful Stamper

Thank you for choosing me as your demonstrator and giving me the opportunity to earn your business!  My goal is to give you your best stamping experience!


Tuesday, December 3, 2019

5 Days of Christmas | Gift Card Holders | Day 2

Welcome to Day 2 of my series on gift card holders!  Did you miss any?  See them here:

5 Days of Christmas| Gift Card Holders | Nicole Steele The Joyful Stamper

It doesn't get any easier than this!  I used a Stampin' Up! mini shipping box to create this gift card holder.  The boxes come in packs of 8 and are scored and ready to assemble.  Just fold!  The finished dimensions are 4" x 3" x 2-5/8", so you could add some special chocolates along with a gift card, or fill it with crumpled strips of cardstock to act as a nest for the gift card.


Stampin' Up! Shipping Box gift card holder using Wrapped In Plaid Designer Series Paper, Perfectly Plaid, and Pine Tree Punch

Supplies used for this holder:


Stampin' Up! Shipping Box gift card holder using Wrapped In Plaid Designer Series Paper, Perfectly Plaid, and Pine Tree Punch


A favorite trick of mine is to curl ribbon ends with a Bone Folder.  I tie the bow, leaving long tails, then take my bone folder and run it several times along each tail.  It adds a touch of playfulness and fullness!

Stampin' Up! Shipping Box gift card holder using Wrapped In Plaid Designer Series Paper, Perfectly Plaid, and Pine Tree Punch


I left the back of the box plain, except for some Wrapped In Plaid DSP.  

The only measurements you need for this holder are the ones for the Wrapped In Plaid DSP that covers the box sides:

  • 3-1/2" x 2-1/4" (2 pieces)
  • 2-1/2" x 2-1/4" (2 pieces)
Bonus: The 6"x6" Wrapped In Plaid paper stack is perfect for cutting these!  1 sheet is all you need per box.  You'll be left with a 1-1/2" x 6" strip that you can shred for filler in the box; cut into skinny strips, curl, and add to box top; or use as a mat for a sentiment on the box front.

Check out two other ways I used the Stampin' Up! Mini Shipping Boxes:


Don't forget about this big Stampin' Up! sale that starts today PLUS another special from me!
Stampin' Up! Year-End Closeout Sale| December 3 - January 2 | Shop with Nicole Steele The Joyful Stamper
  
Click here for the full sale list.

Click here to shop Retiring items.  These are available while supplies last.

Click here to shop Discounted items.  These are available while supplies last.

Click here for Holiday Catalog items that are carrying over.  Starred items will be available again in the 2020 Holiday Catalog.  Unstarred items will be in the 2020-2021 Annual Catalog in June.

Free Shipping on orders over $70 before tax and shipping | December 3-15 | only with Nicole Steele The Joyful Stamper

  • Orders must be placed with Nicole Steele at my online store between Tuesday, December 3 and Sunday, December 15.
  • Free shipping applies to orders of $70 or more (before shipping and tax)
  • Shipping will be refunded by a check mailed to you from me, Nicole Steele.  Checks will be mailed by December 15.
  • Orders must use the Host Code B422JZJ2 if between $70 - $149.  
  • Orders $150 or greater do not need to use the host code - I want you to receive your Stampin' Rewards and you will still get free shipping from me, Nicole Steele.
  • Questions?  Ask me at nicole@thejoyfulstamper.com.


Friday, November 29, 2019

Herringbone Technique With Wrapped In Plaid Suite

If you live in the US, how was your Thanksgiving holiday, friend?  I cooked the entire feast (with the exception of dessert) and it wasn't that bad!  Allrecipes magazine had a day-by-day planner in an issue from last year and it was fantastic - easy to follow, simple but delicious recipes, and everything cooked at the same oven temperature.  No hiccups whatsoever!  The best part was that I WON our turkey this year.  The small, all-volunteer fire department the next town over holds its famous Turkey Bingo every November and I won a game on the first night!  Woo-hoo!  After enjoying it roasted with a honey butter glaze, that turkey's carcass is right now in my crockpot on low heat making stock for winter soups.  I also made a ginger-pear cranberry sauce that was delicious.  Allrecipes magazine is a winner in my book - we've never had a disappointing recipe.

Let's jump from turkey leftovers to PAPER leftovers!


present card using Stampin' Up!'s Wrapped In Plaid suite and herringbone technique


The herringbone technique is an oldie but goodie.  It's a classic that sticks around because it makes such beautiful use of the smallest pieces of paper.  It's the equivalent of a quilt making excellent use of leftover fabric (or at least I imagine it to be; I've never been a quilter).  There's a photo tutorial for the herringbone technique below.   

present card using Stampin' Up!'s Wrapped In Plaid suite and herringbone technique

I used Wrapped In Plaid Designer Series Paper on both these cards.  Once the strips were glued to a Whisper White cardstock panel, I wrapped Shaded Spruce/Gold Striped Ribbon around it like you would a present and tied it in a bow.  Then, I matted that panel to a Shaded Spruce (top card) or Cherry Cobbler (bottom card) cardstock panel.  The card bases are 5-1/2" x 8-1/2" Thick Whisper White folded in half.

The tree tags were made with the Pine Tree Punch and Cherry Cobbler (top card) and Shaded Spruce (bottom card) cardstock.  The sentiments were stamped with Versamark and heat embossed with White Stampin' Emboss Powder and a Heat Tool.  Sentiments are from Perfectly Plaid ("Ho Ho Ho") and Snowman Season ("To/From"). Solid Whisper White Baker's Twine was used to tie the trees around the bow.


Tip: To stamp "Ho Ho Ho" vertically, ink just the first part of the sentiment as shown in the photo above.  Stamp once, ink the same way again, and stamp a second time just below the sentiment.  Repeat the process to stamp the sentiment a third time.

Herringbone Technique Photo Tutorial

Apply adhesive to a 3-1/2" x 4-3/4" Whisper White cardstock panel.
Diagonally lay a DSP strip.  Your strips can be any width you like.


Lay down a second DSP strip that is perpendicular to the first strip.


Lay down a third DSP strip that is parallel to the first strip and perpendicular to the second strip (see where the arrow is pointing in the photo).


Lay down a fourth DSP strip that is parallel to the second strip and perpendicular to the third strip (see where the arrow is pointing in the photo).


Repeat that process until that section is finished.  The same steps are used to complete the other sections of the Whisper White cardstock panel.

5 Days of Christmas Begins Monday December 1

5 Days of Christmas | Gift Card Holders | December 2 - 6 | Nicole Steele The Joyful Stamper

If you like these photo tutorials, then connect with The Joyful Stamper in any of these ways:


6 Pack of Christmas Card Tutorials - November's Host Code gift - 7YNXHH3W - shop with Nicole Steele

Thank you for choosing me, Nicole Steele, as your demonstrator!  I appreciate your business!

Wednesday, November 20, 2019

Easy Way To Get Snowy Trees With Embossing Powder

I can't throw out my paper scraps - argh!!!  More often, I hear paper crafters say they can't cut into their paper (they "hoard" it).  Well, there are no issues with that in Nicole's Stamping Cottage because I'm usually too excited to use it.  But I save every little piece!  Do you do this...stare at the piece in your hand... think, "Hmmm....I should toss this....it's no bigger than my fingernail....wait, I have a star punch I might want to use with this someday...." and back into the scrap bag it goes.  


Splitcoaststampers Card Sketch Challenge 776

Solution: this sketch from Splitcoaststampers that beautifully uses those designer series paper scraps!  Grab a handful, trim them down to 1/2" wide or so, and stick them on your card front at interesting angles.

Stampin' Up! Perfectly Plaid Christmas card with Wrapped In Plaid paper scraps and heat embossed snow

Can you see how I did that on my card?  The paper is Wrapped In Plaid Designer Series Paper - and no way can I throw out any of that warm and cozy plaid!

Stampin' Up! Perfectly Plaid Christmas card with Wrapped In Plaid paper scraps and heat embossed snow

Look at the "snow" on my trees!  No, it's not Snowfall Accents Puff Paint (go to this post to see what happens when you add that directly on a stamped image).  I dipped a Stampin' Sponge in a Versamark ink pad, then lightly tapped it around my stamped tree image.  I sprinkled on White Stampin' Emboss Powder then melted it with a Heat Tool.  Isn't that a great effect?  And if you overdo the Versamark, just take a paintbrush and brush off some of the embossing powder.

Stampin' Up! Perfectly Plaid Christmas card with Wrapped In Plaid paper scraps and heat embossed snow

Ready to make this?  Yes you are!  I made a printable pdf just for you!  


Don't forget to shop the Online Extravaganza sale in my online store, now through this Friday the 22nd only!  Get discounts on select ink pads, cardstock, and bundles.  Click here to see what's on sale.
Stampin' Up!'s Online Extravaganza sale - November 20 through 22 - shop with Nicole Steele


Monday, November 18, 2019

Same Layout, Different Stamp Set

As you read this, I am just returning from a packed 4-day trip to Las Vegas for Stampin' Up!'s OnStage.  Hopefully, you've been following me on Facebook and Instagram to see the sneak peeks of product and projects in the upcoming Occasions and Sale-A-Bration catalogs!

But let's get back to the now.  And right now, we are thinking of Thanksgiving and Christmas!

I had a pile of Wrapped In Plaid Designer Series Paper scraps on my desk and decided to recreate this card from my weekly Tuesday Facebook Live.  It makes such effective use of those too-pretty-to-toss smaller pieces AND it's a simple layout.  Win-win!  

Stampin' Up!'s Perfectly Plaid Christmas card using Wrapped In Plaid DSP scraps

You can follow the link above for a printable step-by-step that will tell you how to create the basic layout.  Instead of stamping and punching out a snowman, you stamp and punch out a pine tree using the Perfectly Plaid Bundle (includes Perfectly Plaid stamp set and Pine Tree punch at a discount).  The Night of Navy rhinestones are from the Basics Holiday Rhinestones Jewels package.  The mix of colors in the package give you a great variety to use on your projects!

Stampin' Up!' Perfectly Plaid Christmas cards using Wrapped In Plaid DSP scraps

The Shaded Spruce/Gold Striped Ribbon adds a classy touch!

Click any of the links below to shop my online store:

Perfectly Plaid Bundle

Wrapped In Plaid Designer Series Paper

Shaded Spruce/Gold Striped Ribbon

Basics Holiday Rhinestones Jewels

Shaded Spruce ink pad

Cherry Cobbler ink pad

Night of Navy cardstock

Cherry Cobbler ink pad

Whisper White cardstock


I hope you are finding value and fun here!  Thank you for choosing me as your demonstrator!

6 Pack of Christmas Card Tutorials with any size order - use host code 7YNXHH3W when shopping with Nicole Steele


01 09 10