
Let's jump from turkey leftovers to PAPER leftovers!

The herringbone technique is an oldie but goodie. It's a classic that sticks around because it makes such beautiful use of the smallest pieces of paper. It's the equivalent of a quilt making excellent use of leftover fabric (or at least I imagine it to be; I've never been a quilter). There's a photo tutorial for the herringbone technique below.

I used Wrapped In Plaid Designer Series Paper on both these cards. Once the strips were glued to a Whisper White cardstock panel, I wrapped Shaded Spruce/Gold Striped Ribbon around it like you would a present and tied it in a bow. Then, I matted that panel to a Shaded Spruce (top card) or Cherry Cobbler (bottom card) cardstock panel. The card bases are 5-1/2" x 8-1/2" Thick Whisper White folded in half.
The tree tags were made with the Pine Tree Punch and Cherry Cobbler (top card) and Shaded Spruce (bottom card) cardstock. The sentiments were stamped with Versamark and heat embossed with White Stampin' Emboss Powder and a Heat Tool. Sentiments are from Perfectly Plaid ("Ho Ho Ho") and Snowman Season ("To/From"). Solid Whisper White Baker's Twine was used to tie the trees around the bow.

Tip: To stamp "Ho Ho Ho" vertically, ink just the first part of the sentiment as shown in the photo above. Stamp once, ink the same way again, and stamp a second time just below the sentiment. Repeat the process to stamp the sentiment a third time.
Herringbone Technique Photo Tutorial
Apply adhesive to a 3-1/2" x 4-3/4" Whisper White cardstock panel.
Diagonally lay a DSP strip. Your strips can be any width you like.

Lay down a second DSP strip that is perpendicular to the first strip.

Lay down a third DSP strip that is parallel to the first strip and perpendicular to the second strip (see where the arrow is pointing in the photo).

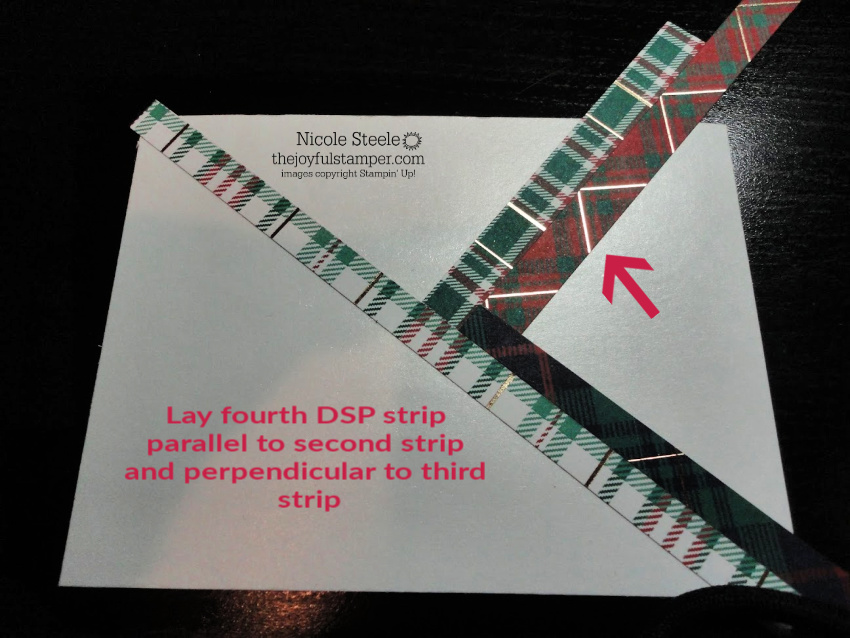
Lay down a fourth DSP strip that is parallel to the second strip and perpendicular to the third strip (see where the arrow is pointing in the photo).
Repeat that process until that section is finished. The same steps are used to complete the other sections of the Whisper White cardstock panel.

5 Days of Christmas Begins Monday December 1

If you like these photo tutorials, then connect with The Joyful Stamper in any of these ways:
- Shop my online store using the host code 7YNXHH3W and receive as my gift to you a 6 Pack of Christmas Card Tutorials ($15 value).
- Shop the Clearance Rack for fantastic deals.
- Request a catalog, if you are not already working with a demonstrator you love.
- Join My Joyful Stampers team - instant community of people who love stamping as much as you do!
- Subscribe to Paper Pumpkin, the monthly crafting kit for those who like neat, simple solutions to their crafting needs. As part of your subscription, you'll receive a monthly newsletter with alternate ideas and an instructional video.
- Attend one of my local, in-person classes - laughter is good medicine!
- Follow me on Facebook for more interaction and spontaneous fun!
- Follow me on Pinterest for daily inspiration.
- Subscribe to my YouTube channel to see stamping demonstrations.
No comments:
Post a Comment