Monday, November 30, 2020

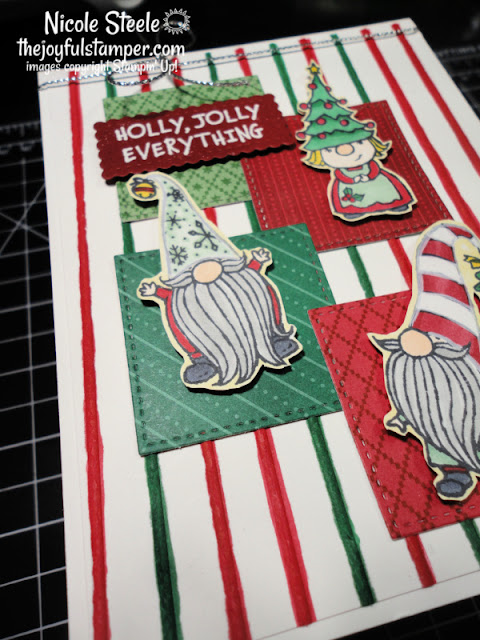
Gnome For The Holidays Card #1

Elderly people are a blessing to me.  I truly feel called by God to work with and for them.  They add a special richness to my life unlike any other age group.  Their appreciation of the simple things in life, their wisdom, and their genuine delight in conversation are why I enjoy being with them.

I recently dropped off a large bag of Christmas cards to my local assisted living facility.  They're used as bingo prizes for the residents and sold to visitors in the gift shop.  All the money is used to fund resident programs.  

The volunteer coordinator keeps thanking me for the donations, but I don't think she understands just how much of a favor she is doing me - the residents' and visitors' love of my cards allows me to keep doing what I love, plus it feels wonderful to know how much they enjoy them.  


gnome for the holidays, christmas card, christmas, handmade card, handstamped cards, gnomes, stampin' up!, nicole steele, the joyful stamper, independent stampin' up! demonstrator, pittsburgh pa, learn to make cards, how to stamp, how to make cards

This week, I'm featuring the Gnome For The Holidays stamp set.  I HAD TO HAVE this set when the Holiday catalog was first released.  The cuteness and the coloring opportunities are what grabbed me.

gnome for the holidays, christmas card, christmas, handmade card, handstamped cards, gnomes, stampin' up!, nicole steele, the joyful stamper, independent stampin' up! demonstrator, pittsburgh pa, learn to make cards, how to stamp, how to make cards

Stampin' Blends were my choice of coloring medium, but Stampin' Write Markers would work just as well.  What's the difference between these two types of markers?

Stampin' Blends are alcohol-based.  That means colors can be layered and blended to create highlights and shading, without fear of color-contaminating the marker tips (that is, ruining a tip by getting a different color on it).  Stampin' Blends will also color smoothly, without marker streaks.  My favorite advantage of Blends, though, is the ability to color embellishments (like pearls and rhinestones) with them.

Stampin' Write Markers are water-based dye inks, like our ink pads.  You can color with them, but I especially love them for coloring directly on stamps.  It's an easy way to get multi-colored images.  You can also use them to scribble on a clear block, then pick up that ink with a damp Water Painter and watercolor.

gnome for the holidays, christmas card, christmas, handmade card, handstamped cards, gnomes, stampin' up!, nicole steele, the joyful stamper, independent stampin' up! demonstrator, pittsburgh pa, learn to make cards, how to stamp, how to make cards

Whichever marker type you use, they'll work for this card.  Draw fun stripes in Real Red and Shaded Spruce for a fun background!  Color those adorable gnomes!

The gnomes are hand-cut with Paper Snips (no dies available for this set) and attached with Stampin' Dimensionals to squares of 'Tis The Season Designer Series Paper, die-cut with Stitched Shapes.

🌞Joyful Stamper Card Recipe
  • Fold in half at 5-1/2" a 4-1/2"x11" Thick Whisper White piece of cardstock.
  • Draw stripes with a Real Red and Shaded Spruce Stampin' Blends marker on a 4"x5-1/4" piece of Thick Whisper White cardstock.  Glue to card base.
  • Tie twine or ribbon of your choice around the top of the card (I used retired silver twine).
  • Cut 4 squares using the Stitched Shapes dies and 'Tis The Season Designer Series Paper.  Glue to card.
  • Stamp gnome images in Memento Tuxedo Black ink on Thick Whisper White cardstock.  Color with Stampin' Blends.  I used Basic Black, Smoky Slate, Real Red, Mint Macaron, and Daffodil Delight.  Tip: outline gnome images with a Light Daffodil Delight Stampin' Blends to highlight them.
  • Cut gnomes with Paper Snips and attach to card with Stampin' Dimensionals.
  • Stamp sentiment in Versamark ink on Cherry Cobbler cardstock.  Sprinkle on White Stampin' Emboss Powder and melt with Heat Tool.  Die-cut with Stitched So Sweetly dies and attach to card with Stampin' Dimensionals.

πŸ‘‡πŸ‘‡πŸ‘‡πŸ‘‡πŸ‘‡
Shop the Supply List for this card - All supplies are in my store!  Just click the link to see the full list.

If you are enjoying The Joyful Stamper site

  • Request a catalog package here, if you don't already have a demonstrator you love.
  • Subscribe to Stampin' News, a weekly email that delivers fun, tips, and specials right to you.  Get a free exclusive Stampin' News Subscriber pdf tutorial as a sign-up thank you!
  • Shop my store and to save money check out the Clearance Rack and Discounted Bundles.
  • Use this month's Reward Code to earn points towards a $50 shopping spree - read the details here.
  • Join me every Thursday at 11 AM ET for my weekly Happy Half Hour Live stamping show on my Facebook page.  


Joy in being creative, community in sharing a common interest, purpose in what we make - this is stamping at its best!  Thank you, friends, for choosing me as your demonstrator!

Nicole Steele, Owner of The Joyful Stamper, Independent Stampin' Up! Demonstrator


Tuesday, November 10, 2020

2 Pretty and Easy Fall Card Ideas

My sweet team leader Lyssa Zwolanek of Song Of My Heart Stampers brightened my day with these 2 autumn-themed cards.  I've been on her team for almost 8 years now and each year gets more fun than the last!  In fact, we have a meeting tonight on our team's Facebook page and I guarantee I'll be looking forward to it all day.  With Lyssa's permission, I've included the Card Recipes below.  


Beautiful Autumn Card
beautiful autumn, autumn punch pack, simple stamping, easy cards, fall, gratitude, thank you, stampin' up!, learn to make cards, learn to stamp, hobbies, nicole steele, independent stampin' up! demonstrator, pittsburgh pa, the joyful stamper

  • Cut a Crumb Cake card base of 4-1/4"x11", folded in half at 5-1/2".
  • Cut a 4"x5-1/4" piece of Crumb Cake cardstock and glue to the card base.
  • All images are stamped and punched with the Beautiful Autumn Bundle.
  • Stamp little leaves in Crumb Cake ink on the card's background.
  • Stamp and punch 2 leaves in Cajun Craze ink on Cajun Craze cardstock.
  • Stamp and punch 2 leaves in Cherry Cobbler ink on Cherry Cobbler cardstock.
  • Stamp and punch 2 acorns in Bumblebee in on Bumblebee cardstock.
  • Zig zag and adhere Bumblebee Gingham Ribbon.
  • Stamp sentiment in Crumb Cake ink on Whisper White cardstock.
  • Punch with 2-1/4" Circle Punch and adhere to card with Stampin' Dimensionals.
  • Add Champagne Basics Rhinestones.

Shop the Supply List for this card - All supplies are in my store!


Harvest Hellos Card
harvest hellos, rectangular postage punch, simple stamping, easy cards, fall, apple builder punch, stampin' up!, learn to make cards, learn to stamp, hobbies, nicole steele, independent stampin' up! demonstrator, pittsburgh pa, the joyful stamper

  • Cut a 5-1/2"x8-1/2" base from Crumb Cake cardstock and fold in half at 4-1/4".
  • Cut a 3"x4-1/4" piece of Bumblebee cardstock and glue to card base.
  • All images are from Harvest Hellos.
  • In Bumblebee ink, stamp the sentiment on Whisper White cardstock (the stamp set has 6 greetings to choose from). 
  • Use the Rectangular Postage Punch to punch out the sentiment panel and also panels from Pear Pizzazz and 2020-2022 In Color Designer Series Paper Pack.  Glue to card.
  • Stamp apple in Real Red ink on Real Red cardstock.  Use Apple Builder Punch to punch out apple, a stem in Early Espresso, and a leaf in Pear Pizzazz.  Glue to card.

Shop the Supply List for this card - All supplies are in my store!


πŸ‘‡πŸ‘‡πŸ‘‡πŸ‘‡πŸ‘‡
Last day to register for November's Creativity Kit! Read the details here.
Use the special code shown in Thursday's Live when you email me your Creativity Kit registration and I'll send you the Bonus Idea packet for your kit!  Order both Creativity Kits and save $5 and get the packets for BOTH these Bonus Ideas!

snowflake wishes, snowflake splendor, christmas cards, stamp kit, stamp class, online stamp class, learn to stamp, how to make a card, learn to make a card, how to stamp, learn stamping techniques, stampin' up!, nicole steele, the joyfulstamper, independent stampin' up! demonstrator from pittsburgh pa

perfectly plaid, christmas cards, pine tree punch, stamp kit, stamp class, online stamp class, learn to stamp, how to make a card, learn to make a card, how to stamp, learn stamping techniques, stampin' up!, nicole steele, the joyfulstamper, independent stampin' up! demonstrator from pittsburgh pa

If you are enjoying The Joyful Stamper site

  • Request a catalog package here, if you don't already have a demonstrator you love.
  • Subscribe to Stampin' News, a weekly email that delivers fun, tips, and specials right to you.  Get a free exclusive Stampin' News Subscriber pdf tutorial as a sign-up thank you!
  • Shop my store and to save money check out the Clearance Rack and Discounted Bundles.
  • Use this month's Reward Code to earn points towards a $50 shopping spree - read the details here.
  • Join me every Thursday at 11 AM ET for my weekly Happy Half Hour Live stamping show on my Facebook page.  


Joy in being creative, community in sharing a common interest, purpose in what we make - this is stamping at its best!  Thank you, friends, for choosing me as your demonstrator!

Nicole Steele, Owner of The Joyful Stamper, Independent Stampin' Up! Demonstrator

Saturday, November 7, 2020

Saturday Card Sketch 826 - Toile Christmas Vintage Card

This week's Splitcoaststampers sketch is easy to work with and gives you the opportunity to add many layers of loveliness, whether with patterned or specialty papers or a rainbow of colored cardstock.

card sketch, how to make a card, card design, card layout, splitcoaststampers, stampin up, cardmaking, learn to stamp, how to stamp, stamping challenges

I went with layers of Designer Series Paper.  Specifically, the wonderfully vintage and nostalgic Toile Tidings DSP.  I also used the stamp set Toile Christmas - it has many classic images!

toile christmas, christmas card, vintage christmas card, stampin' up!, paper crafts, how to make a card, handmade cards, learn to stamp, hobbies, nicole steele, independent stampin' up! demonstrator, the joyful stamper, pittsburgh pa

I LOVE piling layers on my cards and I love letting everything "fall where it may" so that it looks natural and organic.  It doesn't always work out so that it looks nice, but when it does....YES!  


toile christmas, christmas card, vintage christmas card, stampin' up!, paper crafts, how to make a card, handmade cards, learn to stamp, hobbies, nicole steele, independent stampin' up! demonstrator, the joyful stamper, pittsburgh pa

See that gold lattice behind the cardinal?  That is a Square Vellum Doily heat embossed with Gold Stampin' Emboss Powder!  Just smoosh a Versamark ink pad all over a doily, sprinkle on gold powder, then melt with a Heat Tool.  Beautiful magic!  

Watch the video below to learn how to create this vintage look, how to distress your paper edges, and how to heat emboss the Square Vellum Doily.  **Note: Unknown to me, the video abruptly shut off.  Fortunately, the entire card was made and all you'll miss is me stamping the envelope.**


Pin, print, or save the tutorial for this card.  Full supply list is in this tutorial.  


free stamping tutorial, how to make a card, how to stamp, stampin' up!, nicole steele, the joyful stamper, independent stampin' up! demonstrator


November's Creativity Kit registration is open until November 10.  Read the details here.

πŸ‘‡πŸ‘‡πŸ‘‡πŸ‘‡πŸ‘‡
Use the special code shown in Thursday's Live when you email me your Creativity Kit registration and I'll send you the Bonus Idea packet for your kit!  Order both Creativity Kits and save $5 and get the packets for BOTH these Bonus Ideas!

snowflake wishes, snowflake splendor, christmas cards, stamp kit, stamp class, online stamp class, learn to stamp, how to make a card, learn to make a card, how to stamp, learn stamping techniques, stampin' up!, nicole steele, the joyfulstamper, independent stampin' up! demonstrator from pittsburgh pa

perfectly plaid, christmas cards, pine tree punch, stamp kit, stamp class, online stamp class, learn to stamp, how to make a card, learn to make a card, how to stamp, learn stamping techniques, stampin' up!, nicole steele, the joyfulstamper, independent stampin' up! demonstrator from pittsburgh pa


If you are enjoying The Joyful Stamper site

  • Request a catalog package here, if you don't already have a demonstrator you love.
  • Subscribe to Stampin' News, a weekly email that delivers fun, tips, and specials right to you.  Get a free exclusive Stampin' News Subscriber pdf tutorial as a sign-up thank you!
  • Shop my store and to save money check out the Clearance Rack and Discounted Bundles.
  • Use this month's Reward Code to earn points towards a $50 shopping spree - read the details here.
  • Join me every Thursday at 11 AM ET for my weekly Happy Half Hour Live stamping show on my Facebook page.  


Joy in being creative, community in sharing a common interest, purpose in what we make - this is stamping at its best!  Thank you, friends, for choosing me as your demonstrator!

Nicole Steele, Owner of The Joyful Stamper, Independent Stampin' Up! Demonstrator


Thursday, November 5, 2020

Creativity Kit Sneak Peek of Bonus Ideas - Facebook Live

 Every Thursday at 11 AM ET I go live on The Joyful Stamper Facebook Page.  Everyone is invited for some stamping fun!  After the Live class, I'll post the replay below.  This week I'm showing you sneak peeks of 2 of the Bonus Ideas from November's Creativity Kits.  They're SO pretty!


perfectly plaid, christmas cards, stamp kits, online stamp classes, stamp class at home, learn to stamp, learn to make cards, stampin' up, nicole steele, independent stampin' up! demonstrator, the joyful stamper

The first Creativity Kit features Perfectly Plaid and the Pine Tree Punch.  There's SO much mileage to be had from these 2 products!  Each kit includes at least $20 of Stampin' Up! product, class packets to make 4 stepped-up cards, a PDF of written instructions, 4 class videos that you can watch whenever you like, at least 2 Bonus Ideas, plus my signature treat.

snowflake splendor, snowflake wishes, christmas cards, stamp kits, online stamp classes, stamp class at home, learn to stamp, learn to make cards, stampin' up, nicole steele, independent stampin' up! demonstrator, the joyful stamper

You also have the option to add on the bundle at catalog price - I pay the shipping & tax for you!

The second Creativity Kit for this month features the Snowflake Splendor suite and Snowflake Wishes Bundle.  My jaw was hitting the floor as I designed the cards!


πŸ‘‡πŸ‘‡πŸ‘‡πŸ‘‡πŸ‘‡
Use the special code mentioned in the Live when you email me your Creativity Kit registration and I'll send you the Bonus Idea packet for your kit!  Order both Creativity Kits and save $5 and get the packets for BOTH these Bonus Ideas!


Registration is open until November 10.  Read the details here.

snowflake wishes, snowflake splendor, christmas cards, stamp kit, stamp class, online stamp class, learn to stamp, how to make a card, learn to make a card, how to stamp, learn stamping techniques, stampin' up!, nicole steele, the joyfulstamper, independent stampin' up! demonstrator from pittsburgh pa

perfectly plaid, christmas cards, pine tree punch, stamp kit, stamp class, online stamp class, learn to stamp, how to make a card, learn to make a card, how to stamp, learn stamping techniques, stampin' up!, nicole steele, the joyfulstamper, independent stampin' up! demonstrator from pittsburgh pa


If you are enjoying The Joyful Stamper site

  • Request a catalog package here, if you don't already have a demonstrator you love.
  • Subscribe to Stampin' News, a weekly email that delivers fun, tips, and specials right to you.  Get a free exclusive Stampin' News Subscriber pdf tutorial as a sign-up thank you!
  • Shop my store and to save money check out the Clearance Rack and Discounted Bundles.
  • Use this month's Reward Code to earn points towards a $50 shopping spree - read the details here.
  • Join me every Thursday at 11 AM ET for my weekly Happy Half Hour Live stamping show on my Facebook page.  


Joy in being creative, community in sharing a common interest, purpose in what we make - this is stamping at its best!  Thank you, friends, for choosing me as your demonstrator!

Nicole Steele, Owner of The Joyful Stamper, Independent Stampin' Up! Demonstrator


Tuesday, November 3, 2020

2 New November Creativity Kits - Snowflake Splendor & Perfectly Plaid

I've got 2 Creativity Kits for you this month and both are Christmas-themed!  Each Creativity Kit is $35 but if you order BOTH kits, you'll save $5!  The deadline to register is Tuesday, November 10.  Email me at nicole@thejoyfulstamper.com to register.  

snowflake wishes, snowflake splendor, christmas cards, stamp kit, stamp class, online stamp class, learn to stamp, how to make a card, learn to make a card, how to stamp, learn stamping techniques, stampin' up!, nicole steele, the joyfulstamper, independent stampin' up! demonstrator from pittsburgh pa

Snowflake Splendor Creativity Kit includes:

  • 4 card project kits - all pieces are cut and embossed for you (other than what you'll use your Snowflake Wishes dies for)
  • $20 of Stampin' Up! product
  • Bonus ideas to continue using your kit pieces
  • PDF of written tutorials
  • link to recorded class videos creating the kit projects at a relaxed, slower pace - I want you to feel like we're stamping together!
  • Earn 1 Joyful Stamper Reward Point for every 3 months you order Creativity Kits
  • Kit shipping is included in the price
  • The option to add on the Snowflake Wishes Bundle for just the catalog price.  I pay shipping and tax!
To complete the kit, you will need a die-cutting machine to use with the dies.  

Inks used are Balmy Blue, Night Of Navy, Highland Heather, Pool Party, and Memento Tuxedo Black ink.  

Adhesives used are Multipurpose Liquid Glue, Mini Glue Dots, and Stampin' Dimensionals.

You can use the inks and adhesives you have (they are not included in the kit) or order them here.


perfectly plaid, christmas cards, pine tree punch, stamp kit, stamp class, online stamp class, learn to stamp, how to make a card, learn to make a card, how to stamp, learn stamping techniques, stampin' up!, nicole steele, the joyfulstamper, independent stampin' up! demonstrator from pittsburgh pa


Perfectly Plaid Creativity Kit includes:

  • 4 card project kits - all pieces are cut and embossed for you (other than what you'll use your Pine Tree Punch for)
  • $20+ of Stampin' Up! product
  • Bonus ideas to continue using your kit pieces
  • PDF of written tutorials
  • link to recorded class videos creating the kit projects at a relaxed, slower pace - I want you to feel like we're stamping together!
  • Earn 1 Joyful Stamper Reward Point for every 3 months you order Creativity Kits
  • Kit shipping is included in the price
  • The option to add on the Perfectly Plaid stamp set and Pine Tree Punch for just the catalog price.  I pay shipping and tax!

Inks used in the  projects are: Shaded Spruce, Cherry Cobbler, Garden Green, and Soft Suede

Adhesives used in the  projects are: Mini Glue Dots, Multipurpose Liquid Glue, Stampin' Seal, and Stampin' Dimensionals.

You can use the inks and adhesives you have (they are not included in the kit) or order them here.

How to Get a Joyful Stamper Creativity Kit

Email me at nicole@thejoyfulstamper.com by November 10 for this month's kits.  Kits are $35 each.  If you'd like to add on the stamp set or Bundle, please include that in your email.  A PayPal payment request will be sent to your email and must be paid within 24 hours.  You do not need a PayPal account to pay - credit and debit cards can be used to pay the invoice.

πŸ‘‰The kits will ship by November 24.  If a product backorder delays the shipping of the kits, I will clearly and immediately communicate that to you.  Similar substitutions may need to be made if products become unorderable.πŸ‘ˆ

If you are enjoying The Joyful Stamper site

  • Request a catalog package here, if you don't already have a demonstrator you love.
  • Subscribe to Stampin' News, a weekly email that delivers fun, tips, and specials right to you.  Get a free exclusive Stampin' News Subscriber pdf tutorial as a sign-up thank you!
  • Shop my store and to save money check out the Clearance Rack and Discounted Bundles.
  • Use this month's Reward Code to earn points towards a $50 shopping spree - read the details here.
  • Join me every Thursday at 11 AM ET for my weekly Happy Half Hour Live stamping show on my Facebook page.  


Joy in being creative, community in sharing a common interest, purpose in what we make - this is stamping at its best!  Thank you, friends, for choosing me as your demonstrator!

Nicole Steele, Owner of The Joyful Stamper, Independent Stampin' Up! Demonstrator

Monday, November 2, 2020

Easy Background Technique with Embossing Folders

 On my weekly Facebook Live class a couple weeks ago, I played around with the Bricks & Mortar 3D Embossing Folder.  I LOVE the look that resulted!  Check it out!


posted for you, bricks embossing folder, postage punch, stampin' up!, white craft ink, how to make a card, learn to stamp, hobbies, nicole steele, independent stampin' up! demonstrator, the joyful stamper, pittsburgh pa

After embossing a 4"x5-1/4" piece of Misty Moonlight cardstock, I lightly dragged a Whisper White Craft Pad across it.  The ink pad brushed the raised portion of the cardstock, creating this gorgeous whitewashed brick wall!  

This is a pretty card that doesn't take a long time to make, either.  Follow the recipe below:
  • Cut a 5-1/2"x8-1/2" card base from Misty Moonlight cardstock.  Fold in half at 4-1/4".
  • Cut a 4"x5-1/4" piece of Misty Moonlight cardstock.  Run through Stampin' Cut & Emboss machine with Bricks & Mortar 3D Embossing Folder.
  • Lightly drag a Whisper White Craft Ink Pad across the embossed piece.  Glue to card base.
  • Stamp images from Posted For You - Balmy Blue ink on Balmy Blue cardstock and Petal Pink ink on Petal Pink cardstock.  
  • Punch images with Rectangular Postage Stamp Punch.  Glue to card with Stampin' Dimensionals.
  • Stamp sentiment on Whisper White cardstock in Misty Moonlight ink.  Trim and adhere to card with Stampin' Dimensionals.
  • Use Dark Pool Party Stampin' Blends to color Basics Pearls.  Add to card.

heartfelt stamp set, plaid, bricks embossing folder, heart punch, stampin' up!, how to make a card, learn to stamp, hobbies, nicole steele, independent stampin' up! demonstrator, the joyful stamper, pittsburgh pa

This is the second card I taught.  It uses a clever Cut & Tuck trick to slip in a 1-3/4"x4" piece of your favorite Designer Series Paper (Plaid Tidings was used here).  Jump to the 15:00 mark of my Live and you'll see how to make the cut that lets you slip in the patterned paper.  I love how the Bricks & Mortar 3D Embossing Folder adds a masculine feel to this birthday card.  Stamp and punch a couple hearts using the Heartfelt Bundle (sentiment is from Posted For You), add Misty Moonlight Ribbon, and you've got a fun card to mail!

See the fall version of this Cut & Tuck trick (with written directions) here.


πŸ‘‰πŸ‘‰πŸ‘‰2 new Creativity Kits coming tomorrow!  Also new tomorrow - 2 stamp sets, 1 die set, 1 pack of paper!  Sign up for my weekly Stampin' News to see them first!πŸ‘ˆπŸ‘ˆπŸ‘ˆ


If you are enjoying The Joyful Stamper site

  • Request a catalog package here, if you don't already have a demonstrator you love.
  • Subscribe to Stampin' News, a weekly email that delivers fun, tips, and specials right to you.  Get a free exclusive Stampin' News Subscriber pdf tutorial as a sign-up thank you!
  • Shop my store and to save money check out the Clearance Rack and Discounted Bundles.
  • Use this month's Reward Code to earn points towards a $50 shopping spree - read the details here.
  • Join me every Thursday at 11 AM ET for my weekly Happy Half Hour Live stamping show on my Facebook page.  


Joy in being creative, community in sharing a common interest, purpose in what we make - this is stamping at its best!  Thank you, friends, for choosing me as your demonstrator!

Nicole Steele, Owner of The Joyful Stamper, Independent Stampin' Up! Demonstrator

01 09 10