Friday, January 31, 2020

Try This Dreamy Color Combination

I was feeling fancy on this fun Friday (and apparently alliterative, too), so today's stamped project is multi-layered, dreamy, detailed, heavily embellished, and just over-the-top.  Which is my favorite kind of card!  


Encouragement card using Stampin' Up!'s Stargazing set | lots of stars | Mint Macaron, Highland Heather, Smoky Slate, Gorgeous Grape color combination

What first inspired this card was the color combination of Highland Heather, Mint Macaron, Smoky Slate, and Gorgeous Grape (I made a graphic for you to pin, save, or print at the end of this post).  Since the word "dreamy" immediately came to mind, I reached for the Stargazing set.

Encouragement card using Stampin' Up!'s Stargazing set | lots of stars | Mint Macaron, Highland Heather, Smoky Slate, Gorgeous Grape color combination

I repeatedly stamped the Mint Macaron layers with Mint Macaron ink and the swirl image.  

Two Very Easy Techniques: The top cardstock layer's corners were separated (just use your nail).  The bottom layer of Mint Macaron cardstock was spritzed with water, crumpled in a ball, then flattened and dried with a Heat Tool.  


Encouragement card using Stampin' Up!'s Stargazing set | lots of stars | Mint Macaron, Highland Heather, Smoky Slate, Gorgeous Grape color combination

Nests of ribbon, twine, or thread are popular and for a great reason - the more imperfect and messy they are, the better they look!  I'm pretty good at being imperfect and messy 😁 so this works for me!  I made a Silver Metallic Thread nest on this card. 

To create a nest: run SNAIL adhesive on your cardstock, wrap the ribbon/twine/thread around 3 or 4 of your fingers several times, remove, and press the material to the cardstock where you ran SNAIL.  You can adjust however you like since SNAIL is a forgiving adhesive.

Encouragement card using Stampin' Up!'s Stargazing set | lots of stars | Mint Macaron, Highland Heather, Smoky Slate, Gorgeous Grape color combination

I wanted a bow that was full and shabby, so I cut lengthwise a piece of Mint Macaron Textile Ribbon.  I tied the 2 pieces together in a bow and the nicely frayed edges that resulted was exactly the look I wanted!

Pin, save, or print this color combination!

Highland Heather, Mint Macaron, Gorgeous Grape, Smoky Slate color combination


Remember, any order of $35 or more (before shipping and tax) receives the project kits from Tuesday's Live!  Use Host Code 349VN7VY and be sure to place your order by Midnight ET tonight!  See the project sheet here.  Click image to watch the replay.

If you are enjoying The Joyful Stamper site

  • Want a catalog and don't already work with a demonstrator you love?  Request a free catalog package by emailing me at nicole@thejoyfulstamper.com or via this form.
  • High-quality stamping products make your crafting experience better so don't cheat yourself!  Shop my store for your crafting supplies!
  • New to stamping?  Welcome!  The Beginner Brochure was designed for you.  Also check out this card for a perfect first dip into cardmaking.  I can mail it to you with a free catalog package - just email me at nicole@thejoyfulstamper.com to request one.
  • You'll love my crafting videos on The Joyful Stamper YouTube channel!  Subscribe while you're there and click the bell so that you always have fresh inspiration.
  • Looking for community, a hobby, or a way to make extra money?  My team of My Joyful Stampers has a place for you (and the Starter Kit is the especially ULTIMATE bargain right now)!  Read more here.

Thank you for choosing me as your demonstrator!  I appreciate your business!

Thursday, January 30, 2020

A Valentine's Day Card For Him + Video

Alaina and I went to see Dancing With The Stars on Tour last night.  It was a Christmas gift.  She's in her 10th year of dance lessons, she's in our church's dance ministry, and DWTS is our favorite show to watch together.  I HAD to get tickets when I found out they were coming to Pittsburgh!  The high energy twisting and turning, bending and contorting, fast stepping and jumping had me doing the same in my seat (well, more like in my head - but I was dancing just as gorgeously as the pros in there 😂).

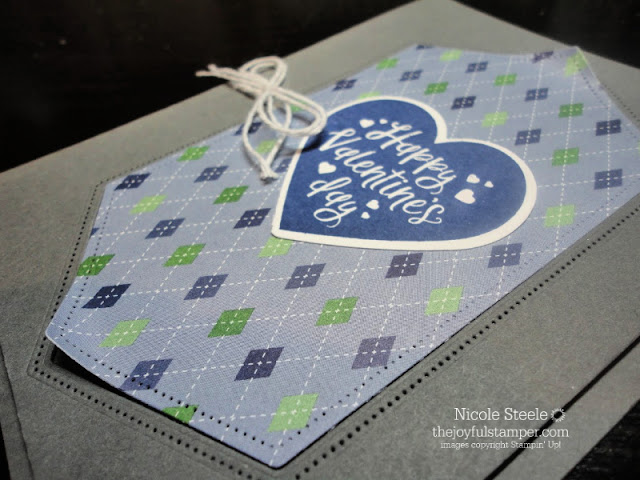
Simple masculine Valentine's Day card for him using Heartfelt and Country Club Designer Series Paper

Blue, green, and gray for Valentine's Day?  Yes!  Don't forget the dudes in your life!  Sons, dads, grandfathers, husbands, boyfriends, fiance - any guy!


Simple masculine Valentine's Day card for him using Heartfelt and Country Club Designer Series Paper

The men in my life are straightforward, no frills guys and this card reflects that.  Just a few cuts and minimal supplies.  Simple color palette that won't make them squirm.  No over-the-top embellishments.

Simple masculine Valentine's Day card for him using Heartfelt and Country Club Designer Series Paper

This little paper curl is as fancy as it gets.  Shop for the supplies below and be sure to watch the video for how this card was made.

Make this card in under 10 minutes!  Click image to watch the video.


Shop my store for all the supplies:

Heartfelt Bundle (stamp set & punch pack at a 10% discount)


Remember, any order of $35 or more (before shipping and tax) receives the project kits from Tuesday's Live!  Use Host Code 349VN7VY and be sure to place your order by Midnight ET this Friday!  See the project sheet here.  Click image to watch the replay.

If you are enjoying The Joyful Stamper site:

  • New to stamping?  Welcome!  The Beginner Brochure was designed for you.  Also check out this card for a perfect first dip into cardmaking.  I can mail it to you with a free catalog package - just email me at nicole@thejoyfulstamper.com to request one.
  • High-quality stamping products make your crafting experience better so don't cheat yourself!  Shop my store for your crafting supplies!
  • You'll love my crafting videos on The Joyful Stamper YouTube channel!  Subscribe while you're there and click the bell so that you always have fresh inspiration.
  • Looking for community, a hobby, or a way to make extra money?  My team of My Joyful Stampers has a place for you (and the Starter Kit is the especially ULTIMATE bargain right now)!  Read more here.

Thank you for choosing me as your demonstrator!  I appreciate your business!

Wednesday, January 29, 2020

Splitcoaststampers Card Sketch 786

I took the Jeopardy! online test last night.  I just know I'm getting the call from Alex this time 😋  Seriously, though, this is the best I've done on a Jeopardy! test so I really am hoping for an audition call this time.  And it'd be in Cleveland, just 2 hours away!  So if I ever get on the show, should I ask Alex if he's ever made a card?  And do you think there'd be a Papercrafting category?  That'd be wild!  

On to today's post..... 


Splitcoaststampers Card Sketch Challenge 786

I can't say enough wonderful things about Splitcoaststampers and its challenges, especially the sketch one.  It kickstarts a stamping session like nothing else.  

Clean and Simple Valentine's Day card using Heartfelt stamp set


This is a very clean and simple card that took me about 10 minutes to create.  That's because I started with the sketch and Stampin' Up!'s From My Heart product suite.  I laid the suite out on my desk, studied the sketch, and it fell together from there.  Limiting one's supplies makes imagination expand.  Have you found that to be true?


Clean and Simple Valentine's Day card using Heartfelt stamp set

This particular pattern from the From My Heart Designer Series Paper (DSP) pack reminds me of ribbon candy.  


Clean and Simple Valentine's Day card using Heartfelt stamp set

Little touches add so much playfulness!  Like:
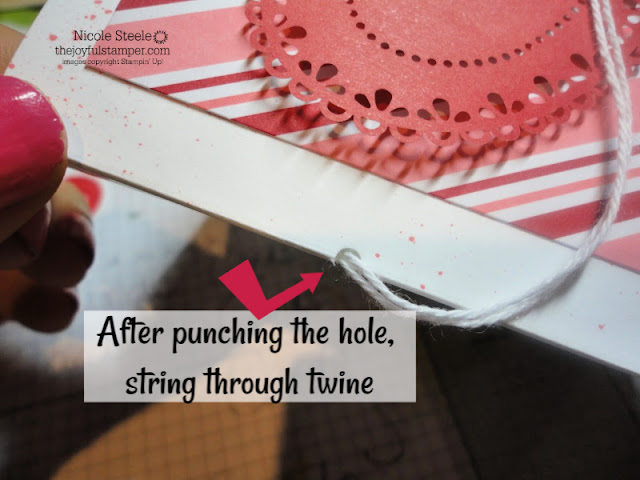
If you need to string ribbon or twine through a card fold, here's a tip for you.  Feel free to pin this!

Punch a small hole on the fold of your card to string through twine.
Punching tip for tying ribbon through card fold

After punching the hole, string through the twine.
Punching tip for tying ribbon through card fold

I know, I could have just made a top-folding card in this case, but I cut and folded the card base without knowing I was going to use twine.  And I know, I could have just cut another card base that was top-folding but, again, I was well into making this card before I realized I was going to use twine.  SO, if you find yourself in that position, too, just use a standard hole punch to do the trick I just showed you!  We're stampers!  We can fix anything!


Pin, download and save, or print the tutorial for today's clean and simple Heartfelt card


Come back tomorrow for a Valentine For Him card!  I even made a video AND it only takes about 10 minutes to make, just like this one did today.

sneak peek of a Valentine for Him card | on The Joyful Stamper blog Thursday

Remember, any order of $35 or more (before shipping and tax) receives the project kits from Tuesday's Live!  Use Host Code 349VN7VY and be sure to place your order by Midnight ET this Friday!  See the project sheet here.  Click image to watch the replay.

Thank you for choosing me as your demonstrator!  I appreciate your business!

Tuesday, January 28, 2020

Happy (Half) Hour Facebook Live Projects

I'm making a separate post for today's Facebook Live so that the resources are easily found in one spot.  If you couldn't watch live, I've posted the replay below.  Make sure to follow me on Facebook to get notified when I go live and subscribe to my YouTube channel (hit the bell, too!).


Remember, any order of $35 or more (before shipping and tax) receives the project kits for today's Live!  Use Host Code 349VN7VY and be sure to place your order by Midnight ET this Friday!

Today's projects were created for the TGIF challenge to be inspired by the 2020 Mini and Sale-A-Bration catalog covers.


If you are enjoying The Joyful Stamper site:

  • New to stamping?  Welcome!  The Beginner Brochure was designed for you.  Also check out this card for a perfect first dip into cardmaking.  I can mail it to you with a free catalog package - just email me at nicole@thejoyfulstamper.com to request one.
  • High-quality stamping products make your crafting experience better so don't cheat yourself!  Shop my store for your crafting supplies!
  • You'll love my crafting videos on The Joyful Stamper YouTube channel!  Subscribe while you're there and click the bell so that you always have fresh inspiration.
  • Looking for community, a hobby, or a way to make extra money?  My team of My Joyful Stampers has a place for you (and the Starter Kit is the especially ULTIMATE bargain right now)!  Read more here.

Thank you for choosing me as your demonstrator!  I appreciate your business!

The Joyful Stamper Stampin' News

The Joyful Stamper Stampin' News | weekly updates

If you have these sets, you'll want to read this!

Sale-A-Bration product coordination release on February 4 to customers and now for demonstrators

Beginning February 4 (or now, if you are a demonstrator), products that coordinate with current Sale-A-Bration offerings will be available.
We'll also be getting a 12"x12" pack of Designer Series Paper that has images and patterns that work with 4 of our punches:

These new dies and paper CAN be added to a Starter Kit (your BEST DEAL), so if you just can't wait to have them, join my team of My Joyful Stampers now!


The Happy (Half) Hour Live Stamping Class


The Happy (Half) Hour Live Stamping Class | Tuesdays at 2 PM ET on The Joyful Stamper Facebook page

Every Tuesday at 2 PM ET I go live on The Joyful Stamper Facebook Page.  

I'll post a project sheet and the video in a separate post later today.  Don't forget to join me at 2 PM ET!  Follow my Facebook page and set your notifications to be alerted when I go live.

Try This Gorgeous Color Combination!

Flirty Flamingo, Mossy Meadow, Pretty Peacock color combination

Pin this graphic to your Pinterest board of color inspiration!  If you're like me, you reach for the same colors time and again.  Creating a board dedicated to Stampin' Up! color combinations gives you fresh inspiration every time you stamp.
Sympathy card using Breathtaking Bouquet and color combination of Flirty Flamingo, Mossy Meadow, and Pretty Peacock


My Favorite Sale-A-Bration Freebie

The Metallic Baker's Twine & Sequins Combo Pack is my favorite Sale-A-Bration item.  I'm a sucker for embellishments because more is more when it comes to creating (plus emebellishments get used up which gives me a reason and space to buy more)!

Look at how the concept artist created a rainbow with the sequins!  Such a fun idea!

Rainbow card from Sale-A-Bration catalog featuring Metallic Baker's Twine & Sequins Combo Pack

These sequins are striped, which adds to their unique adorableness.  Plus, getting two spools of twine and a generous container of sequins means LOTS of play time.  The colors are bright and fresh for spring, too - Bermuda Bay, Calypso Coral, and So Saffron.

Here are two more ways to use the Metallic Baker's Twine & Sequins Combo Pack.  

Another way to use the free Sale-a-Bration item Metallic Baker's Twine & Sequins Combo Pack | Under My Umbrella bundle

Another way to use the free Sale-a-Bration item Metallic Baker's Twine & Sequins Combo Pack | Under My Umbrella bundle

See the video here for the projects.

If you are enjoying The Joyful Stamper site:

  • New to stamping?  Welcome!  The Beginner Brochure was designed for you.  Also check out this card for a perfect first dip into cardmaking.  I can mail it to you with a free catalog package - just email me at nicole@thejoyfulstamper.com to request one.
  • High-quality stamping products make your crafting experience better so don't cheat yourself!  Shop my store for your crafting supplies!
  • You'll love my crafting videos on The Joyful Stamper YouTube channel!  Subscribe while you're there and click the bell so that you always have fresh inspiration.
  • Looking for community, a hobby, or a way to make extra money?  My team of My Joyful Stampers has a place for you (and the Starter Kit is the especially ULTIMATE bargain right now)!  Read more here.

Thank you for choosing me as your demonstrator!  I appreciate your business!

Monday, January 27, 2020

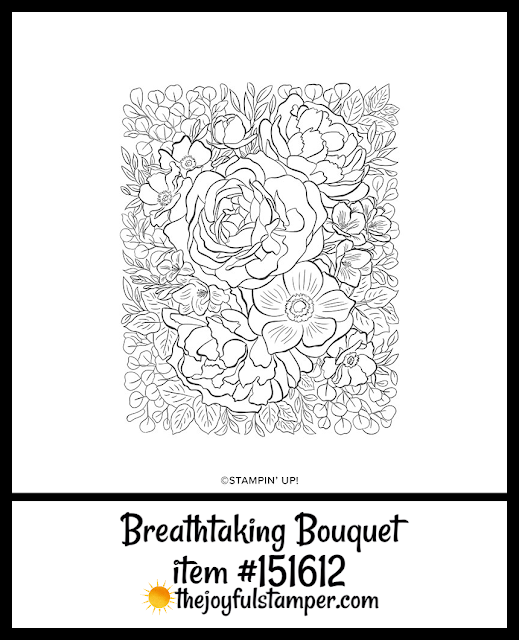
Sophisticated Sympathy Card with Breathtaking Bouquet and Golden Honey DSP

Hello, stamping friends!   The weekend was pretty fantastic.  It rained ALL day Friday - which is my kind of day- and that night the Steele clan dashed through the drops to hit a local burger place.  Burger, fries, and a shake are a classic combination that can't be beat.  Saturday was a work day for me and that night we had pizza with my parents, then watched the final movie in The Maze Runner series (The Death Cure, which isn't the most uplifting of titles but it was a great movie).  One of my favorite things is when I'm having hearty, laugh-until-you-cry moments with my family and we had those this weekend!  I read a quote over the weekend about realizing you are living your "good 'ol days" and it struck me that I really am!

I LOVE the card I have to share today.  REALLY love.  I have a tutorial for you to pin, save, or print at the end of this post. 


sympathy card using Stampin' Up!'s Breathtaking Bouquet set & Golden Honey Designer Series Paper

It is a sympathy card but it wasn't made for any particular person, fortunately.  I prefer to make these kinds of cards ahead of time.  

I had the idea to pair the Golden Honey DSP (a free Sale-A-Bration item) with just the largest flowers from Breathtaking Bouquet.  I thought the gold and black against the colored flowers would be striking.  It was!

sympathy card using Stampin' Up!'s Breathtaking Bouquet set & Golden Honey Designer Series Paper

The sentiment is from Itty Bitty Greetings, a fantastic set that has the cutest sized sayings for every occasion (32 to be exact).  I stamped it in Versamark, sprinkled with Gold Stampin' Emboss Powder, and melted the powder with a Heat Tool.  

Tip: to avoid stray powder on the cardstock rub the paper with an Embossing Buddy prior to stamping.  It removes any static that would cause the embossing powder to stick where you didn't stamp.

sympathy card using Stampin' Up!'s Breathtaking Bouquet set & Golden Honey Designer Series Paper

Those vibrant layers of color are from Stampin' Blends markers.  Alcohol ink is a dream to work with.  The color flows out smoothly, there are no marker lines, and it's possible to layer and mix colors seamlessly without contaminating your marker tips.  

Keep reading for this card's tutorial that you can pin, save, or print!

FREE with $50 order!
Golden Honey Designer Series Paper | Free Sale-A-Bration item with $50 order


Find it on page 31 in the 2020 Mini Catalog
I colored and cut the four largest flowers in the middle.
Stampin' Up!'s Breathtaking Bouquet background stamp in 2020 Mini Catalog


Pin, download and save, or print the tutorial for this card.
Download to save or print free Breathtaking Bouquet and Golden Honey DSP sympathy card tutorial


If you are enjoying The Joyful Stamper site:

  • New to stamping?  Welcome!  The Beginner Brochure was designed for you.  Also check out this card for a perfect first dip into cardmaking.  I can mail it to you with a free catalog package - just email me at nicole@thejoyfulstamper.com to request one.
  • High-quality stamping products make your crafting experience better so don't cheat yourself!  Shop my store for your crafting supplies!
  • You'll love my crafting videos on The Joyful Stamper YouTube channel!  Subscribe while you're there and click the bell so that you always have fresh inspiration.
  • Looking for community, a hobby, or a way to make extra money?  My team of My Joyful Stampers has a place for you (and the Starter Kit is the especially ULTIMATE bargain right now)!  Read more here.

Thank you for choosing me as your demonstrator!  I appreciate your business!
Friday, January 24, 2020

2 Cool Tricks To Stretch Your Stamping Supplies and Make a Triple Impact PLUS a video

Your crafting supplies and tools are investments.  Fun investments, to be sure, but still something that you want to get the most use from.  Any time I discover a new way to use something I already own is a HAPPY time!  It makes me do cartwheels!  And today, I have 2 ideas to share with you that will help you s-t-r-e-t-c-h your supplies.


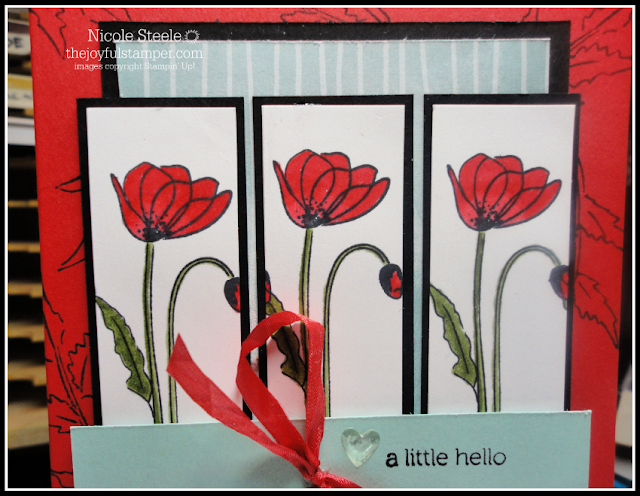
Trick #1: Stamp your image three times on a 3" wide piece of cardstock, then use your Stampin' Trimmer to cut into 3 equal 1" wide sections.  For maximum impact, mat each 1" section onto a 1-1/4" wide cardstock mat.  The triple repetition is a stunning eye-catcher!  

In my example, I stamped an image from Painted Poppies in Memento Tuxedo Black Ink on Whisper White cardstock, then used Stampin' Blends to color them (Light & Dark Poppy Parade, Light & Dark Mossy Meadow).


Trick #2: While you have your Stampin' Blends out, use them to custom color ribbon!   Lay the ribbon flat on Stampin' Grid paper to protect your work surface, then run the brush tip of the Stampin' Blend marker down the ribbon.  The color will transfer instantly and smoothly and also dry quickly.  

The ribbon in my example is Whisper White Crinkled Seam Binding and I used a Dark Poppy Parade Stampin' Blend on it. Look at the vibrancy of that ribbon!  One spool of Whisper White Crinkled Seam Binding Ribbon + your favorite Stampin' Blends colors = a rainbow of options!


Here's a Behind-The-Scenes story that you probably can relate to: I faced major indecision over what color to stamp the background on the Real Red cardbase.  At first, I was going to use the same color ink so that the background would be subtle.  But then I thought how striking stamping it in Tuxedo Black would be, especially with the Basic Black mats.  No joke, I spent 10 minutes  going back-and-forth over this!  I violated my own design rule of NO OVERTHINKING.  Finally, I scolded myself for doubting my instinct (and wasting precious stamp time) and went with the Tuxedo Black - and LOVED it!!

Watch the video to see this card made from start to finish. 


Card Recipe:

Painted Poppies stamp set
Itty Bitty Greetings stamps set
Peaceful Poppies Designer Series Paper (3"x4-3/4")
Dark & Light Poppy Parade Stampin' Blends
Dark & Light Mossy Meadow Stampin' Blends
Memento Tuxedo Black Ink
Whisper White Crinkled Seam Binding Ribbon
Heart Epoxy Droplets
Basic Black cardstock (5"x3-1/4") (2-5/8"x1-1/4")x3
Poppy Parade cardstock (5-1/2"x8-1/2") folded in half for card base
Whisper White cardstock (3"x2-1/2") cut into 1" wide sections after stamping
Pool Party cardstock (3-3/4"x3/4")

If you are enjoying The Joyful Stamper site:

  • New to stamping?  Welcome!  The Beginner Brochure was designed for you.  Also check out this card for a perfect first dip into cardmaking.  I can mail it to you with a free catalog package - just email me at nicole@thejoyfulstamper.com to request one.
  • High-quality stamping products make your crafting experience better so don't cheat yourself!  Shop my store for your crafting supplies!
  • You'll love my crafting videos on The Joyful Stamper YouTube channel!  Subscribe while you're there and click the bell so that you always have fresh inspiration.
  • Looking for community, a hobby, or a way to make extra money?  My team of My Joyful Stampers has a place for you (and the Starter Kit is the especially ULTIMATE bargain right now)!  Read more here.

Thank you for choosing me as your demonstrator!  I appreciate your business!


Thursday, January 23, 2020

Splitcoaststampers Card Sketch 785

Valentine's Day may be my new favorite crafting holiday.  It was Halloween, but the hearts are winning me over.  And there's still chocolate involved 😊  

I have an in-person Valentine's class today and I love to leave a little surprise, or "pillow gift", at each person's spot, so a lot of projects were made for that.  I also sell and donate cards, so many will go into the hands of others as a way to express their affections this February 14.  It's just so stinkin' FUN to create and it's wonderful there are a TON of ways to use this for a purpose.  


Splitcoaststampers card sketch 785

So, yes, it's another Valentine's Day card for this week's Splitcoaststampers Sketch Challenge!  If you are a regular reader of my blog or follow me on Facebook, you have an arsenal of ideas by this point.  Time for another!

Heartfelt classic red and black Valentine's Day card

This is a very simple and straight-forward card.  Fold in half a 5-1/2"x8-1/2" piece of Real Red cardstock.  Glue on (2) 3-1/2"x2" pieces of From My Heart Specialty Designer Series Paper.  Using the Layering Squares dies, cut 2 scalloped squares from Basic Black cardstock and 1 scalloped Square from Real Red cardstock and glue them together.  

Heartfelt classic red and black Valentine's Day card

Stamp the outline heart from the Heartfelt stamp set in Memento Tuxedo Black Ink 3 times on Real Red cardstock.  Stamp the sentiment in Versamark ink on Basic Black cardstock.  Sprinkle with White Stampin' Emboss Powder and melt with a Heat Tool.  Punch out all 4 hearts with the Heart Punch.

Glue everything to the card base as shown.  Add a Clear Faceted Gem to the sentiment heart.  Tie a bow with Black Satin Ribbon and adhere with a Glue Dot.


Download and save or print the free tutorial for this card.
free tutorial for Heartfelt Valentine's Day card

Remember, any order of $35 or more (before shipping and tax) receives the project kits from Tuesday's Live!  Use Host Code 349VN7VY and be sure to place your order by Midnight this Friday!

Free Facebook Live project kits with $35 minimum order | Nicole Steele The Joyful Stamper


If you are enjoying The Joyful Stamper site:

  • New to stamping?  Welcome!  The Beginner Brochure was designed for you.  Also check out this card for a perfect first dip into cardmaking.  I can mail it to you with a free catalog package - just email me at nicole@thejoyfulstamper.com to request one.
  • High-quality stamping products make your crafting experience better so don't cheat yourself!  Shop my store for your crafting supplies!
  • You'll love my crafting videos on The Joyful Stamper YouTube channel!  Subscribe while you're there and click the bell so that you always have fresh inspiration.
  • Looking for community, a hobby, or a way to make extra money?  My team of My Joyful Stampers has a place for you (and the Starter Kit is the especially ULTIMATE bargain right now)!  Read more here.

Thank you for choosing me as your demonstrator!  I appreciate your business!

01 09 10