Friday, June 28, 2019

Inspiration From A Store-Bought Card

Did you ever see something and think, "I have to make that into a card!"?  Was it a color combination you spied, or a home decor piece, or a magazine layout?  

Sometimes I get ideas from the graphics at church!  A peek into my sermon journal would show occasional sketches in the margins of those screen graphics that catch my eye. 


Recently my family received a thank you card from my cousin's daughter and I immediately thought, "I have to make this into a card!"  


This store-bought thank you card inspired my birthday card

The colors appealed to me as did the simple prettiness of the one-layer notecard.  I used Perennial Birthday to create my CASE.

The images in that set are SO fun to play with!  They are pretty, fresh, and light-hearted.  I love the font of that "Happy Birthday" on my card.


Use Tombow Liquid Glue to apply glitter to flowers

To apply Dazzling Diamonds glitter to the flowers, I applied a small dot of Tombow Liquid Glue and used my finger to lightly spread it around.  Then I shook the glitter over the flower and let the card sit to dry.  I applied glitter to all the flowers.  Look at them sparkle!


Happy Birthday CASEd card

My sentiment sits on an extra layer of Whisper White cardstock because I needed to cut it in half to make it fit the space.  You could cut the stamp itself in half to give yourself more flexibility in using it.  I have done that with other sets.  

To add color to the flowers and leaves, I used sponge daubers to apply color.  It gives such a beautiful, soft look and it's so easy to do!  Just put the sponge dauber on your finger, pick up some ink with it from your ink pad, then gently rub in a circular motion on your cardstock.  So pretty!!


Stampin' Up! color combination - bermuda bay, smoky slate, old olive, garden green

These are the colors I used to create my CASE.  Make sure to click on it to Pin It so you can be inspired next time you make a project!  Matching Stampin' Up! colors to what I want to CASE is easy thanks to all the choices they give us.  I also love that their products coordinate - creating is fun and I know what I make will look nice.  I have other color combinations I'd like to try, so come back to see what those will be!

I'd love for you to subscribe to my weekly email newsletter!  You'll always know about upcoming Stampin' Up! promotions (like the Clearance Rack update that happened yesterday), read tips that make your creating session more productive, and more.  I have a free Class To Go pdf for you as a thank you when you subscribe.  Just click below! 

Wednesday, June 26, 2019

Stampin' Up! Clearance Rack Updated!

And it's with stamp sets!  They're while supplies last.  Click here to see everything!


Stampin' Up! Clearance Rack Updated

There are so many great bargains, especially when combined with what was already on the rack.  Click the Shop Sun below to go to my clearance rack store!


Shop The Clearance Rack

I so appreciate your business!  Have a joyful day!


Dance Layout for Scrapbook Sketch Challenge

I have another scrapbook page to share featuring my youngest daughter's Lyrical dance photo.  Her routine for this year's dance recital was breath-taking!  Alaina is in the most wonderful dance program.  It's called Bella School of Dance and the owner Anna Kate's mission is to teach dance in a wholesome and age-appropriate manner.  Her dance school is highly relational and non-competitive.  The recitals are so moving and expressive!


12 x 12 scrapbook layout of Lyrical dance photo

This Share What You Love DSP just retired but I thought it went too perfectly with Alaina's costume not to use it.  


close up of blinged out embellishment and stamped sentiment

I added a TON of Basic Rhinestones to my scalloped circle die.  I had just half as many stuck on originally, then took a deep breath and added the other half - and I loved it!  The sentiment is from the (very) retired En Suite stamp set.  

close up of punched flowers and stamped title

Check out the title!  I stamped it in alternating colors of Blackberry Bliss and Old Olive.  I wanted it to stand out more so I added a small strip of Vellum beneath it and some pearls to the letters.  Tip: Remember, you can use Stampin' Blends markers to color your pearls to make them any shade you want!

I made this layout for The Studio Challenges June sketch challenge.  I almost always use a sketch when I scrapbook because it allows me to focus on the fun part - mixing and matching colors and patterns, journaling, and adding embellishments.

If you would like a copy of the NEW Stampin' Up! Annual Catalog and you don't already have a demonstrator you love, send me an email at nicole@thejoyfulstamper.com.  I'd love the opportunity to earn your business!  


Monday, June 24, 2019

Bird Ballad Notecard Set Part 2

I showed you two of the four notecards I had made in this post from Friday.  Now I'll show you the next two!  They use stamped images from Free As A Bird.


Bird Ballad Notecard 3

Coloring with Stampin' Blends markers means your images will not have marker lines and there will be nice blending of shades.  You can use different colors on the same image and not worry about the colors contaminating each other.  My bird above uses Dark and Light Petal Pink Blends and Light Crumb Cake Blends.  My flowers use Dark and Light Daffodil Delight and the leaves Dark & Light Old Olive.


Bird Ballad Notecard 4


In this sample, I added a couple cute little flowers colored with a Dark Calypso Coral Blend.  Both of these cards were made with Stampin' Up!'s Whisper White Notecards and Envelopes, which come already cut and scored for you!  

See the other two notecards I made with this product suite in this blog post.

Wouldn't a set of these sweet notecards make a fantastic gift?  Bundle some together with the included envelopes stamped to match and they make a perfect welcome gift for a new neighbor, or for a new mom to write thank yous, or even as a wedding or baby shower game prize.  So many uses!


You Can Make It:

 Click on any of the links above to go to my online store and shop!  I would so appreciate your order!


Friday, June 21, 2019

Bird Ballad Bundle Notecard Set Part 1

I am CRAZY for the Bird Ballad suite!  I can't stop creating with it!  Do you get like that?  Where you just obsessively craft with a specific set of products or even a technique?  I do that and right now I'm doing that with all the Bird Ballad coordinating products - the scalloped lace trim, the trinkets, the DSP, the stamp set, the dies - everything!  


Bird Ballad Notecard 1

Stampin' Up!'s Whisper White notecards are so convenient for making these pretty cards.  They come cut and scored using our Thick Whisper White cardstock and are 3-1/2" x 5" when folded.  A pack has 20 cards and 20 envelopes.  You can also get them in Very Vanilla.  They are a hidden gem in our catalog and you'll find them on page 168.  

Bird Ballad Notecard 2

I cut some of the gorgeous Bird Ballad DSP to 3-1/2" x 5" to fully cover the notecard front, then used Crumb Cake cardstock and the Stitched Nested Labels Dies to create panels for my sentiments.  The sentiments come from Free As A Bird stamp set.  A little bit of Scalloped Lace Trim and Basic Pearls and these are done!

Use Paper Snips to cut DSP elements to add to card

 Here's a tip for you: this DSP has beautiful images that work great as focal pieces on notecards.  Use Paper Snips to cut out those images to add to your cards - no stamping required!  In the first sample, my bird was cut from DSP and in the second sample, I cut feathers from the DSP.  

Come back for my next post to see the other two notecards I made using the Bird Ballad suite.  Or you can subscribe to my blog in the right sidebar by typing in your email address and my posts will automatically show up in your email inbox!

You Can Make It:


 Click on any of the links above to go to my online store and shop!  I would so appreciate your order!

Thursday, June 20, 2019

Old Stuff is Fun, Too

I get it.  

I understand the hold-your-breath anticipation of seeing the UPS truck rumble down your street, knowing your Stampin' Up! order is out for delivery and on that vehicle.

I, too, have felt the heart-pounding thrill of seeing that truck stop in front of your home and the beautiful man in brown walking to your front porch with a (hopefully) large box that has "Stampin' Up!" printed on its sides.

And maybe, once you have opened the box and lovingly caressed your precious new supplies, you even SNIFFED THE PAPER.  

I do it.

A new Stampin' Up! order is fun to get and will always be fun to get.  But it is also fun to blow the dust off our older supplies and create with those.  Doing so brings back memories and feelings of nostalgia for me, because seasons of my life are tied up in when I first enjoyed those older products.  My newer supplies haven't had a chance yet to make those sentimental connections.


12 x 12 scrapbook layout of Alaina's ballet photo

I got my youngest daughter Alaina's dance photos back and decided to participate in Sketch-N-Scrap's sketch challenge.  


close up of 12 x 12 scrapbook layout dance embellishments

I will never part with Stampin' Up!'s En Suite set.  I tried to get a good shot of this - I stamped in Versamark on Basic Black cardstock, sprinkled with black embossing powder, then heat set.  I love the subtle effect it adds to the layout!  I die-cut the images with our Stitched Shapes Dies and Stitched Rectangle Dies.


close up of title and punched flower embellishment

The flower piece in Alaina's hair inspired this embellishment.  I used the retired Blossom Builder, Pansy, and Petite Petals punches to create it with Cherry Cobbler  and Basic Black cardstocks.  The new Hot Air Balloon punch would make great large petals, too!  My title was stamped with the Letterpress Alphabet set (one of the first sets I ever got) in Real Red ink and cut with Paper Snips.  The Paper Snips are small and sharp enough to navigate these letters and make fussy cutting a breeze.  

I didn't want white pearls on my title so I colored them with my Dark Basic Black Stampin' Blend marker.  You can make your pearls any color you want with our Stampin' Blend markers! 

This layout is going into a 12" x 12" shadow box I got here and will be hung on our living room wall.  Alaina also dances in Lyrical and Jazz classes so I'll show you those layouts in future posts.  I hope I've inspired you to mix old and new products on your layouts!  Leave me a comment letting me know what you like to scrapbook!

If you would like a copy of the NEW Stampin' Up! Annual Catalog and you don't already have a demonstrator you love, send me an email at nicole@thejoyfulstamper.com.  I'd love the opportunity to earn your business!  


Tuesday, June 18, 2019

One Card Five Ways

I must need bright colors in my life right now.  When sitting down to create, that is what ends up being pulled from the cardstock shelves and the ink pad holders.  I blame Jeopardy James' loss, now almost two weeks ago, for my need of a pick-me-up.    


Say hello to Lovely Lipstick.

Now, I've been a fan of Jeopardy! for years and there exists on my mental bucket list a line that says, "Be a Jeopardy! contestant".  So you can call me a faithful viewer.


Now behold Blueberry Bushel.

But there was something about James Holzhauer and his aggressive style of play that was addicting to watch.  It gave me a predictable high every weeknight at 7pm #nerdgirl  

(I realize hashtags are not a blogging thing but that just adds emphasis to my point, don't you think?).


Meet Pineapple Punch.

James broke the mold for Jeopardy! contestants - he wasn't conventional, he wasn't a teacher or lawyer, and he played to win.  He had fun on the show and he made it fun for the viewers.


This is Call Me Clover.

I shamefully admit I enjoyed watching him shock and awe the other contestants.  No one comes on the show to battle for second and third places, but that's exactly the battle the two other hopefuls were left to fight, often before the first round was over.


And last we have Grapefruit Grove.

When someone other than James found the Daily Doubles, indignation and outrage would sweep through me and I would think, "How dare they take James' Daily Doubles!"  A couple times the game was close, down to Final Jeopardy, and my family had to rush to retrieve cold compresses for me to get my heart rate back to normal.

And then he lost on June 3.  

I've been stamping in bright colors ever since.  I think there is a correlation there.

You Can Make It:
~2018-2020 In Color 8-1/2 x 11 Cardstock Pack
~Whisper White 8-1/2 x 11 Cardstock
~1/8" Grosgrain Ribbon - Blueberry Bushel, Call Me Clover, Grapefruit Grove,                                            Lovely Lipstick, Pineapple Punch
~2018-2020 In Color Stampin' Write Markers (used to color on stamp, then                                  stamp image several times on cardstock without reinking)
~Gold Faceted Gems
~Daisy Punch (punched three times and layered for a fuller look)
~Leaf Punch
~Itty Bitty Greetings stamp set

Stepping It Up: (for heat embossing the dots on the daisy; still cute cards without it!)

Last Call for my Bird Ballad Class To Go!
Sign-up ends today June 18!
Use Host Code VTFXMJVH


Sunday, June 16, 2019

Using Up DSP Scraps To Make Birthday Cards

Stampin' Up!'s DSP packs are beautiful and fun and a joy to use.  I happily cut into the sheets and create cards, scrapbook pages, and 3D projects.  Then I look at the small mountain of various scraps leftover and they are just too gorgeous to throw away, but what to do with them?  Do you have this problem, too?  These two birthday cards show a way to creatively use them.


Both birthday cards use scraps from the Bird Ballad DSP pack.  In the first card, I used them to create a cake, complete with candles on the top.  The candles from the Birthday Backgrounds set got their dual colors from using markers to color directly on the stamp.  The stamp is actually longer but I wanted just three candles for my cake topper.  

The second card uses scraps to make a present, complete with whisper white baker's twine and a hand-cut tagged stamped with a flower from the Perennial Birthday set.  The large sentiment on both cards is also from that set.  Isn't the font FUN?

The DSP scraps idea and card layouts come from my amazing upline's Cheat Sheets Collections (a great design resource for cardmakers that offers layouts, instructions, and measurements).  

Think of all the fun combinations you could create with your DSP scraps!  I know you have them, so don't let them languish and go to waste.

You Can Make It:

Don't forget to order my Bird Ballad Class To Go by June 18!
Use Host Code VTFXMJVH


Friday, June 14, 2019

A Photo Display For College

Since my oldest girl just graduated from high school a little over a week ago, I have been in both a reflective and prospective state of mind.  Last week, I showed you the mini album I made of her senior photos here.  Recently, there was a tutorial on Splitcoaststampers for a Home Sweet Home mini album.  Immediately I knew I wanted to make it and fill it with photos of Emma's favorite things about home.  It was the perfect way to let her know she is loved while away at school for the first time.
I deviated from the original tutorial by omitting the roof and accordion folding the home to make it flat.  That wasn't my intention, however making it 3D with the roof and four sides made it rather large for a shared dorm room (space is precious!).  The revision was not well thought-out, though, because it doesn't actually tie shut now!  The left edges of the project are not tied shut, but it does allow for standing the album up for easier display so that was the bright side of my mistake.


Check out those adorable key charms!  They are from the Bird Ballad Trinkets.  I love how they match one of the designs in the DSP from that suite.

  
The key charms inspired my title for the album (family holds the keys to love).  I had the idea to use my Stampin' Blends marker to write some of the title on vellum, use a black journaling pen to write the same word on the whisper white cardstock, then layer the vellum over it.  I saw this technique years ago in an idea book by my favorite scrapbooker of all time, Rebecca Sower (she gave me freedom to journal in a more unique manner and I forever love her for that).


And here's the inside once untied and unfolded.  Notice the different pattern on the left most panel as compared to the other three panels.  That, too, was a mistake.  I did not pay attention to the patterns as I was making the cuts to the two 12x12 sheets and I should have, because it mattered when I glued them together.  As with most other things in life, though, mistakes are usually not the big deal we think they are, so I continued on with the album.

What will ultimately go in here are photos of her dad and I, Emma and her two younger sisters, and Lily our little dog.  When so much is changing, it's nice to know there are those back home that are rooting for you!  What would you put in an album like this and who would you give it to?

Tips and Tricks:
  • Use a grade school art class trick to make symmetrical hearts - fold cardstock in half, pencil in half a heart along the fold, and cut along the pencil line (but don't cut the fold) 
  • Use a journaling pen to doodle a frame on the interior cardstock panels.  Perfection not required! 

You Can Make It!
Don't forget to order my Bird Ballad Class To Go by June 18
Use Host Code VTFXMJVH


Wednesday, June 12, 2019

This Little Piggy Makes Me Happy Card

This pig wins the award for being Too Cute!  I mail out lots of cards and this one is perfect for the homebound seniors I write to monthly.  It's bright, it's colorful, and the pig's joy is contagious!


I made this card as a response to a challenge issued by my Stampin' Up! upline.  She creates and sells Cheat Sheet Collections that help cardmakers put together something beautiful.  Lyssa challenged her team to use a Cheat Sheet and the In Colors to make a card.  The 2018-2020 In Colors of Call Me Clover, Lovely Lipstick, Blueberry Bushel, and Pineapple Punch (I did not use Grapefruit Grove) fit the happy mood of the pig image and the sentiment.  I thought the larger Whisper White cardstock piece needed some more interest so I stamped a few times the cloud image from the This Little Piggy stamp set in Blueberry Bushel.  I actually giggled out loud when I did that because I was so in love with the care-free attitude it lent to the card (yes, it's okay to have THAT much fun while creating)! 

If you love creating and stamping and playing along with challenges, too, then you should join my team of Joyful Stampers!  In addition to an amazing discount on products, my team always gets my class pdfs for free.  You'll also always have someone around who shares your passion for stamping.  Ask me any questions and then sign up here.  I'd love to have you on my team!

Tips and Tricks:
  • Use your finger to slightly curl up the edges of the banners.  It adds so much to the card!
  • A pack of the 2018-2020 In Color markers is an inexpensive way to add color to your collection.  I used the Blueberry Bushel marker to ink up the cloud images and "Hogs & Kisses" sentiment.
You Can Make It:
Don't forget to order my Bird Ballad Class To Go by June 18
Use Host Code VTFXMJVH


Monday, June 10, 2019

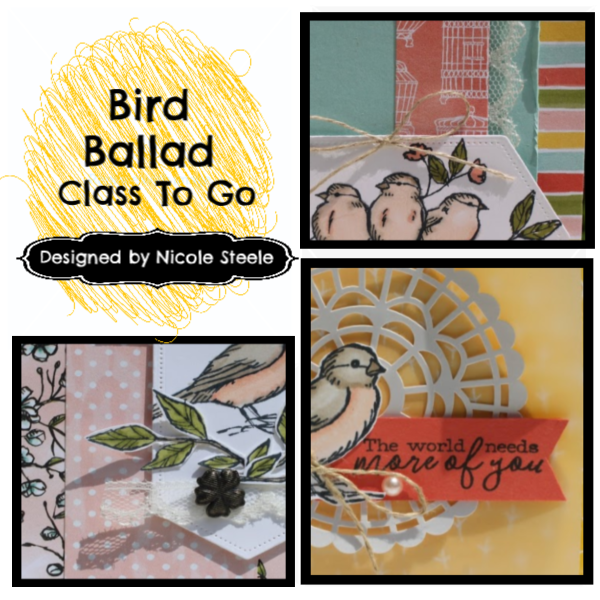
Bird Ballad Class To Go

I love the cards for this Class To Go and you will, too!  The Bird Ballad stamp set is full of beautiful bird and flower images that are so fun to color, plus the sentiments are so sweet.  The DSP (Designer Series Paper) that coordinates with this set is colorful in a soft way, just like spring.  Check out the entire Bird Ballad Suite here.  I had so much fun designing this class and I know you will love creating the projects.

In this Class To Go, you'll receive a pdf via email with step-by-step instructions and full color photos to create three beautiful cards!  You'll also receive a FREE class packet with the materials to make the cards, including envelopes.


To register, go to my online store and order these items using the Host Code VTFXMJVH by June 18:

Everything will ship directly to you.  If you already have any of these items, simply substitute another item(s) of equal or greater value.  You MUST use the Host Code VTFXMJVH by June 18 so that I know you want the Class To Go kit, no exceptions.  There is a box on the online ordering screen to input the code.

Upgrade your order with any of these!  

  • Get the Free As A Bird stamp set bundled with the Stitched Nested Labels Dies and save 10%!
  • Have fun practice coloring with your new blends by adding a pack of Whisper White cardstock.
  • Recommended adhesives are Glue Dots, SNAIL, and Stampin' Dimensionals
  • Paper Snips make fussy cutting a breeze!  I love mine and use them every time I create.
  • You will need a Clear Block E to stick your stamps on for stamping (Free As A Bird stamp set is cling red rubber), if you don't already own a clear block.
You will not be disappointed with this class!  Make sure to order the above items by June 18 using Host Code VTFXMJVH and I will send you your Bird Ballad Class To Go kit for FREE as a thank you.  


01 09 10